Showing posts with label holiday craft. Show all posts

Wednesday, December 17, 2014

fun with dyed chanukah pasta

When I found this happy bag of Chanukah pasta at World Market I scooped it up with a whoop and imagined how pretty it would be dyed in all sorts of happy colors. So I took it home and did just that using this method.
The bag itself isn't too large so each color is only maybe two cups or so of noodles. The teal and purple were accomplished using liquid watercolor while the dark blue and the white needed a little help from some acrylic paint mixed with water. The white and blue got a bit more wet than usual in the shaking process so needed a day to dry with a manual flip in between to get both sides.
Once the noodles are all dry there are oodles of ways for your kiddos to play! Use the pasta as a stand in for gelt during dreidel play. Add it to play dough or color sort onto a sorting mat made from printed/solid paper taped or stitched together. Felt will work for a more permanent mat but happy scrapbook paper will do in a pinch!
Stack the pieces! Have a contest to see who can stack the most in a set time. Up the ante by using only your pinching fingers. Grab a pipecleaner or some yarn and string the noodles up for a pretty necklace or bracelet.
Work on math and patterning by creating various patterns with your kiddos. Set up an art table with glue, paint, and glitter and get to it! There are all sorts of ways you can play! Happy Chanukah!

Wednesday, July 3, 2013

make faux tie-dyed paper flags

 
Here's another project that was inspired by pinterest. There are quite a few pins (and thus, blog posts and videos even) out there relating to this so I cannot attribute it to a single person. Oh and it was also at the San Mateo Maker Faire so there ya go.

 For this project you will need paper, scissors, permanent markers, rubbing alcohol, masking tape, straws or pencils, and either a small misting bottle, ear swap, or eye dropper.
 
Set up in a mess friendly area. I used a vinyl tablecloth with a large sheet of wax paper on top.  To create eight flags you will need a single sheet of white paper 11"X17". You can also use index cards or smaller sheets of paper but I wanted to use a large sheet to get your kiddos into paper folding and cutting on a line. Have your kiddo fold their paper so that they have eight squares. Hand them a pair of scissors and have them cut long the folded lines.
Gather up your permanent markers and get to creating a happy flag. The more marker lines you add, the more blended and colorful your flag will be.
 
Now it is time to add the rubbing alcohol. It goes without saying that you should not leave your child alone while working on this project. The alcohol is a bit intense in scent but so are the markers. It also looks a lot like water so make sure you use a very small container to hold it and never leave your child unattended. The more alcohol that is dripped and dribbled onto the paper, the more it will spread and fade. If you wish for a brighter result, use a cotton swap to "draw" the alcohol onto the marker lines. A fine mister bottle would work as well for older children. Set aside to dry.
 
Once dry, use tape or glue to attach a straw or pencil to the back to create a handle. Ta-da! Fun flags you can wave at your very own Fourth of July parade! Omit the pencils and straws and you cn turn this into a garland by gluing or taping to a couple yards of ribbon.


Saturday, February 2, 2013

valentine diy: glowing cupid's arrows

 Happy February, friends! Today's valentine diy came about when I offered to help a friend make valentines for her kiddos to gift. Being youngsters, they are big fans of the ever happy glow stick so with that in mind I went to drawing board and here is what I came up with. 
Glow sticks are pretty delicate things. I originally had wanted to circle them into their bracelet shapes and stuff into pretty little bags. Alas, to shape is to bend and to bend is to break and so I had to go back to the drawing board. The glow sticks I was using were as straight as an arrow and so I thought...arrows! But how can I make them so that they have a little sturdy help? I sat and I sat and I thunk and I thunk and as I did so I held one lovely glow stick in my hands as inspiration. I thought thye were about the same size as a straw...a straw! I quickly got up and went into my pantry and pulled out a box of happily striped paper straws and an idea was formed! They fit! So grab yourself a pile of glow sticks and an equal pile of paper straws and get to crafting! 

Materials:
*glow sticks
*paper straws
*scissors
*felt or small felt sticky back hearts 
*white glue and glue stick
*red paper
*printer (optional) or pens
*hole punch
*wax paper to work on (it will keep your arrows from sticking to your work surface)

Grab a pile of paper straws and trim about a quarter of an inch of one end. You want the straws to be a smidge shorter than your glow sticks so that once nestled inside they can be easily pulled out.

I used pre-dandied felt hearts from Michaels, they were the perfect size, a bit larger than a quarter. If you cannot find pre-dandied hearts, use a pair of scissors and cut out your own from felt or pretty paper.  Flip hearts over so that their backs are facing up and draw a line of glue in the center. Place one end of a trimmed straw on top of the glue and allow to dry. You will want to pointy end of the heart to point AWAY from the straw. 

While glue is drying, create the tags that will fit your arrows. I printed mine out from the computer (there are oodles of fun free valentine fonts here and here) but you can write them out as well. I had a heck of a time thinking of something to write and so I hit up pinterest and found that there were oodles of glow stick valentines out there (even an arrow design)! Thank you, to the general pinterest public. Once I printed out my message, I trimmed around each one and used a glue stick to affix to scrapbook paper (Target has a fun Valentine's Day pack in their dollar section). Once the glue stick had dried, I punched a hole at each end with my hole punch. Your basic hole punch is the perfect diameter for the paper straws. 
Next up, assemble the glow sticks by carefully adding the connector tube at one end of each stick. Gently thread glow stick into straw, the connector will butt up against the end of the straw and will act as a handle for removal even after the feathered end is glued on.
 Cut our your feathered ends using red scrapbook or construction paper. I accordion folded my paper and cut into smaller pieces 2" by 3" and then trimmed into a proper arrow end shape. After folding each piece in half I added fringe by gently cutting into the sides with going all the way through. 

 Before gluing the ends of the arrows onto your straws, carefully thread your tags onto the straw. To glue ends on, place each end face down onto your wax paper. I use wax paper in case any glue drips out. Glue is easily removed from wax paper, not so esily remove from a tabletop. Add your glue and rest the end of your arrow on top making sure you are at the pointed end of the paper and that the glue is on the straw and not the plastic of the glow stick. The fold in the paper allows for a nice hugging stick. Allow to dry. If yer feeling extra whimsical, try using feathers for the ends instead of cut paper. 
 Once dry, twist labels as needed and carefully bundle up in a shoe box or other container. The lid of an egg carton works pretty nicely. Pass out to friends and have a Happy Valentine's Day! 

Monday, April 2, 2012

make a wee easter egg pillow

 This small project is for you to make for your kiddo if your kiddo is not stitch-friendly. Wip up a couple of these for your kiddo's basket and they can decorate them themselves with markers. Fill em with rice or beans instead of fiber-fill and they become cool packs for bumps and bruises.

Materials
*empty easter candy boxes
*small fabric scraps
*paper & pencil
*pins
*sewing machine 
*needle and thread
*scissors
*markers or paints for your kiddo
Gather up an assortment of small Easter candy boxes. My boxes came from the dollar store and are a smidge smaller than your traditional candy hearts boxes. Create an egg shaped template that is smaller than your box. Cut out with scissors. To more involve your child, you may cut out a small rectangle that matches the front dimension of your box, hand your kiddo a pencil and have them draw their own egg shape. To turn it into a math exercise, hand your kiddo a ruler and let them measure the box to create their own rectangle.
 Pin template to two small fabric scraps making sure at least one of your scraps is blank, right sides facin in.*
 
Stitch around template leaving a small open space for turning out and stuffing. Remove pins and template and cut out. *If you or your child is hand-stitching the egg, cut out the shape first then use a whip stitch in a contrasting thread to anchor pieces together. Don't forget to leave a small opening for stuffing.
 
Turn right side out and stuff. Use dried beans or rice to create cold packs or add a little lavender for some added sweetness. Hand stitch the opening closed and tuck into candy box.
 
 
When your kiddo opens the box, they can decorate their Easter eggs with markers and or paints. Happy Easter!

Wednesday, December 14, 2011

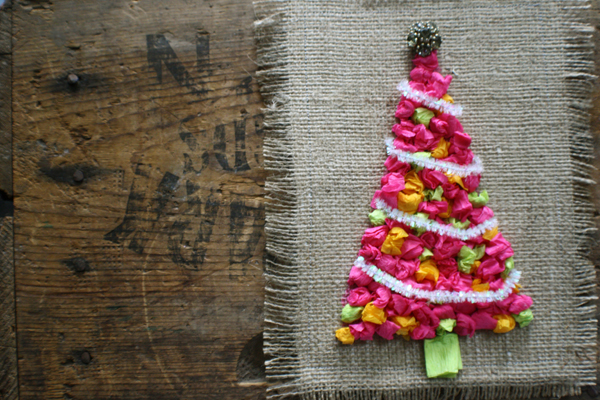
Make a Retro Tissue Tree

 When I was growing up, Christmas and Christmas decor was always a bit of a big deal in my house. There are things that only came out at Christmas time that while now long gone, still stick clearly in the noggin. From my mother's winter window ledge display (handmade by her) to our homemade salt dough ornaments (now lone gone) these iconic holiday goodies are what makes Christmas Christmas. Sadly, most of these treasures have been lost (along with my dear, quirky, mother) but a few are still around and today I am going to show you a redo of a Christmas Wall Hanging my sister made back in the 1960s, when she was six years old. For this version, you'll need to scrounge around for some items you may already have and pick up a small piece of burlap to begin, are ya ready?

Materials
*cardboard (cereal box or other thin board is fine)
*piece of burlap (my finished piece is about 8"X11")
*paint
*sponge
*straight edge
*clothespins or paper clips
*crepe paper (streamers are fine)
*white glue
*scissors
*sparkly pipe cleaner
*vintage button, pin or earring
*yarn
*tape
*sewing machine (optional)
 
Grab your cardboard and cut it down to a manageable size. The original tree is about 10"X12", I repurposed a stuffing mix box (from Turkey Day) and simply cut out the front, it measures about 8"X10".  Cut your burlap down to size about 2"-3" larger all around than your cardboard. Smother your cardboard with glue (the blank side) and center your burlap over it. Place a sheet of wax paper on top and a stack of books to weigh it all down and set is aside to dry. Once the burlap is dry, give it a whirl through the sewing machine, going around all four sides using a running stitch. I ended up doing this after the tissue tree was finished which is fine but you may wish to get a go on it first. You do not need to be it will help keep the burlap in place and give it a little extra incentive to not unravel too much.
While the glue is drying, have your kiddos select up to three (harmonious) colors of crepe paper or streamers. Streamers are great for crafting as they are inexpensive and have multiple uses. My sister's tree used three shades of green. My redo involved a bit of a modern twist on colors. Keep the palette simple which is why I suggest limiting it to three colors. Once they have their colors selected, hand them some scissors and let them cut of squares of streamer into a shallow dish. Set aside.
 While your kiddo is cutting up crepe paper, grab the other side of the box you repurposed (or any piece of cardboard) and cut out a triangle shape for your tree. This is where the straight edge comes in. This part is for grown-ups ONLY. When the glue is dry on your cardboard, clip your tree stencil to the front using paper clips or clothes pins.
Grab a small sponge or cut a clean sponge into a small square and give your paint a squirt onto a lid or other flattish container. Have your kiddo dab the sponge into the paint then onto their burlap. Have them use an up and down motion. This doesn't have to be even, this is more of a guide for the tissue paper and a nice bit of color for any spots that go unnoticed. Set aside to dry, it shouldn't take long,
Pour a small amount of glue onto a lid or other small flat dish or tray and have your kiddo grab a square of tissue and crumple it into a ball. Dab the tissue ball into the glue then place onto the edge of the triangle/tree. Continue until the tree is outlined. They may wish to use all one color or randomly mix it up, either way is fine, it is their tree.
 
Once the outline of the tree is finished, they may continue adding tissue balls until the entire tree is finished. Refill glue as needed. To create the trunk, fold one square in half twice to make a smaller squarish shape.
Once the tissue tree has been completed, give your button/earring/pin a healthy does of tacky glue and glue to the top for the tree's star. 
Next, grab your sparkly pipe cleaner and cut into four pieces varying the lengths. This will become your tinsel. Bend and shape if you wish and give each piece a good dose of glue before pressing down. Set aside to dry. Pipe cleaners and glue can be tricky as the pipe cleaner takes a while to warm up to the glue. Make sure your kiddo has something else to do next so that they do not fiddle with the pipe cleaner pieces.
Once everything is dry, use a large pin or needle to gently tug away the extra strands of burlap from the edges. They should unravel fairly easily. Your kiddo will probably like this part. Lookie at the happy fringe! Use scissors to trim if you need to.
Flip the whole thing over and tape a length of yarn to the back (one legnth of tape at each end of the yarn). I braided up my yarn, you do not have to. You can also use ribbon or twine. If you like, glue a happy paper backing to your board first so that you are not greeted with a product picture (I kinda like the product picture, it will give you a retro feel in about twenty -years or so). Have your kiddo sign and date the back as well. 
 Find a happy place to hang and admire. Now go bake some Christmas cookies! This project uses up all sorts of nifty developmental elements for your kiddo; scissor cutting, measuring, practicing the up and down of the sponge painting, small/fine motor skills during the balling and glueing, patterning and color fun in selecting their colors and shape recognition using "circles" in the triangle. This is a less than open-ended project but has its bits of usefulness in preparing your kiddo for following instructions, planning their vision within a set of instructions and using up all those nifty skills they are developing. I hope you enjoy this project and if you do make a tissue tree, please add it to the flickr group and/or email me an image and link and I'll add you to the 'do! Happy crafting!