Showing posts with label scissors. Show all posts

Monday, July 7, 2014

diy paper rainbow clouds

Back during the spring, we had a week of rainbow fun. One of our projects was these paper rainbow clouds.  We used white paper and crepe paper streamers. The children really had a blast!
Materials:
*sturdy white paper
*crepe paper streamers in rainbow colors
*pens
*scissors
*glue sticks

Step 1: Hand out white paper to your kiddos and have them draw a cloud on it. I used 11" X 17" paper cut in half. Each child got a half sheet to draw their cloud on. I encouraged them to draw the cloud as big as they could. Each child had a different approach to cloud drawing as mentioned in this post.

Step 2: Cut around cloud shape for each kiddo if they are on the younger side. The children in my class are three and not many are confident with their scissors skills. I always ask before cutting. One of the children decided to make a rainbow instead and cut it all out on his own. It was awesome. I wish I caught a picture before he put it in his bag to take home. You can see him beginning to draw it in the third picture from the top there.

Step 3: Set out crepe paper, scissors, and glue sticks and have your kiddos add their streamers. The children used scissors to cut their streamers and glue sticks to adhere them to the paper. We had them glue their streamers to the side that had their cloud drawing on it though not everyone did that. It was all good. We talked a lot about rainbow order but it wasn't necessary for the project.

Step 4: Next, add a second sheet of white paper to the back of each rainbowed cloud. Before using your glue stick to adhere the back on, glue a loop of yarn to the top for easier hanging.Carefully trim with scissors taking care to not cut the streamers off (I speak from experience...d' oh!).


Tuesday, June 17, 2014

impromptu scissors work

 
On the day I had planned for us to begin our sprouting jars I realized I had forgotten to bring tulle to use on our jars. Standing in our classroom kitchen I spied our container of bath scrubbies I had an a-ha! moment and pulled one down. I sat myself down at one of our wee tables and was about to begin cutting when the door opened and the first kiddo of the day walked in. He immediately walked up to me and asked what I was doing. When I told him what I was doing and why he decided he wanted to do it too and so off to the art center he went in search of scissors. He sat there quietly cutting and exploring the plastic mesh for more than 30 minutes. So involved was he that he attracted the attention of another student who wanted to do it as well and so we brought down the scrubbie container and set up a cutting station at the art table. I love it when things like this happen!

Sunday, May 18, 2014

scissors work inspired by Going on a Bear Hunt

The children really love cutting things. Scissors work is a favorite activity and so I thought I would change it up for our week of We're Going on a Bear Hunt. Usually, we cut paper but we have also cut yarn, play dough, and straws. This time around, I set up a station for cutting the tall, wavy grass with daylily leaves as the grass, scissors, and an empty powdered cheese shaker. Some children cut the grass and dropped it into the shaker, others used their grass on their landscapes and some decided not to cut at all and simply fed the grass into the shaker. All kinds of fine motor skills happening here!

Friday, February 21, 2014

special delivery {scissors work}


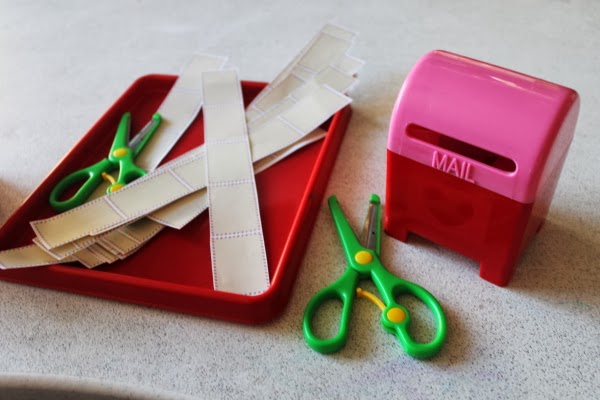
For our week of Valentines I created a file of airmail envelopes for the children to cut and mail. These threes love scissors work and the mail boxes were an added bonus. We also created a post office in the classroom. More photos coming soon. If you would like to print out your own air mail strips for your classroom, click here. Enjoy!

Sunday, October 13, 2013

snip! snip! hooray!


In the three-year-old class we are practicing with scissors.  Construction paper is fairly easy to tear and even easier to cut. I tear strips of paper and mark lines across the width and ask the children to practice cutting along the line.


My aim mostly is to familiarize the children with how scissors are usd and held. We often practice our "thumbs up" mantra when using the scissors  and have more success tearing that last bit than actually cutting it.


Even if the children do not manage to use the scissors all the way through the width of the paper ir even anywhere near a line, the excitement they show when they liberate even the smallest scrap of paper has me offering up a scissors station every day.


Once they cut their pieces they can then choose a section of our paper box to put them into. The same pieces are later incorporated into painting and gluing projects. The sectioned acrylic box came from Target in the dollar section. I have a blue one as well and the children prefer to match their paper with the box and so we cut yellow, and green paper for the green box; and blue, and purple for the blue box.


Snip! Snip! Hooray!

Thursday, May 16, 2013

crepe paper banners!


This is a project I created for scrumdillydilly but I think it can easily be translated into a kid happy craft as well.

Materials:
*index cards or equal sized scrap paper
*5-6 colors of crepe paper streamers
*scissors
*glue
 
To make this kid-happy give them a smaller of piece of paper to work with. If you have a small group of children this will be even more fun as you can see what each child chooses to create. Hand out paper and scissors and set out pre-cut lengths of crepe paper (for kiddos 6 and under) and small bottles filled half-way with glue*.

Scissors-ready children can fold their streamer lengths in half and give them some fringe, older children may be able to scallop if the wish and younger children can leave their streamers as-is. Once they are ready for glueing, hand them their glue bottles (glue sticks will work as well if you prefer) and let them get to work. 
 
If you would like to demonstrate how it is done, begin a discussion using a finished flag and ask the children how they think it was created. You can point out how to work from the bottom up if you really wish for your child to create this specific style but if you leave them alone to create they may surprise you even more. By discussing the project, you are giving your children a dialogue rich in vocabulary and problem solving. You can discuss color theory as well by pointing out a rainbow patter or asking the children to use cool or warm colors. Kick it up a notch and see if the children can create an ABABAB or ABCABCABC pattern in their layering. 
 
Using scissors and squeezing glue bottles promotes both fine and large motor skills as well as self-control. There are all sorts of educational aspects to creating arts and crafts with children. It really is my favorite part of making art with children. All that process makes me very happy. After each child's flag has dried, you can flip them over and trim any excess bits that hang over the edges. Don't trim if your child insists they wish them to remain that way. Hang them along a length of ribbon or string with clothespins and throw an impromptu fiesta complete with cupcakes! 
 
 
 *as a preschool teacher and early childhood art teacher I have found that some children cannot resist squeezing out an entire bottle of glue. If you hand them a small mini bottle such as this or this that is only filled halfway, you can control the gluey-mess a smidge and teach your child a little about control by saying "This is your bottle of glue. When it is empty, it is empty and that will be all the glue for this project." This works most of the time but sometimes there are a few freak outs. When that happens we acknolwedge the child's disappointment and invite them to problem-solve their own solution without giving refilling the glue bottle. After a few rounds they begin to learn more control over the amount of glue they use. Some children however do not seem perplexed over the lack of glue and simply wish to continue squeezing.

Monday, February 4, 2008

Following the Leader....

or rather, the lines...
It's not often I will include a project that is so direction oriented, seriously, all my other posts are meant to inspire. However, this is a simple project geared for your three year olds out there but I am sure your older kidlets will wanna play along also. We're gonna make some hearts! Don't you remember the a-ha moment when you learned how to cut out a "perfect" heart? This set up will help your wee ones who are just getting used to scissors; develop those fine motor skills and some awesome coordination!

What you need:
*paper (any kind will do really)
*kid friendly scissors
*fat markers or crayonsscrumdilly-do it:

Gather up your paper and cut into an assortment of sizes. Keep the sheets large for your smaller kidlets and make the sheets smaller to challenge your scissor pros. Fold each sheet in half.Next up, draw your half a heart template onto one side of each paper. Keep in mind which hand your kidlet is most comfortable using and draw your heart-half out towards the other hand. This will better enable them to cut out the paper along the line. If they are left handed, the fold should be on the left and vice versa. Using a fat tipped marker will help alleviate trauma to those wee ones that are perfectionists, there will be a lot of line for them to cut on and the line will be all the more visible. If you have older kidlets, ask them to help teach their smaller siblings the fine art of heart making. It will make the older kids feel proud and give them an excuse to do something they may think is too young for them to do. I however believe you are never too young to cut out hearts!Ask your kidlets to cut along the line and then show them the magic they had made! If you have an especially scissor happy kidlet, have them practice on an old magazine. What better way to recycle than to turn it into art.Set out glue and larger sheets of paper, folders, paper plates or what have you and have your wee ones make a collage. Or, you can ask each kidlet to write down or recite words of love and encouragement for your family and put them in a glass jar to be read on Valentine's Day. Let's share the love, shall we? Have fun!