Showing posts with label spin art. Show all posts

Saturday, January 11, 2014

the lion and the mouse: spin art lions!


Back in the fall we spent a week with The Lion and the Mouse. One of our art projects was to make a spin art lion. The kiddos as school LOVE painting with our salad spinner.
 
This was a bit unplanned but I knew we could do it. I pulled out some coffee filters and dis some quick scissors work to create shapes to use for lion faces. After rifling through the yarn box, I found some funky fiber and had one of the children snip a few strips for whiskers. The paint colors were decided by the children as well after a discussion on what a lion looks like (I think tigers may have influenced their choices as well).
 We used three filters per lion. One filter ends up folding into itself as it spins around the basket. The paint usually seeps through the filters so that they stick together. Three filters are stable enough to spin and hold all the paint. Each child took a turn placing his or her filters into the basket and adding paint before replacing the lid and giving it a spin or two or three or seen or twelve.
 
 
Once they were ready, they removed their now paint splattered filters and selected shapes for their features. We dialogued as they went. The paint is wet and sticky enough to hold the shapes down without needing any glue.
 
Here are two sample lions. The one on the top got three whiskers on each side "like a kitty-cat". The artist also selected orange circle ears but then wanted to turn them into eyes by adding paint. The second lion was all about the gold paint, and the whiskers across the forehead.
Can you tell this one is teacher-made? The children wanted to take theirs home after they were dry so I made one for the curriculum folder. I love how our thrifted little salad spinner can make most anything.

Tuesday, October 15, 2013

make a spin art raccoon!


During the first two weeks of school our theme was The Kissing Hand by Audrey Penn. We talked a lot about school and feeling and raccoons...

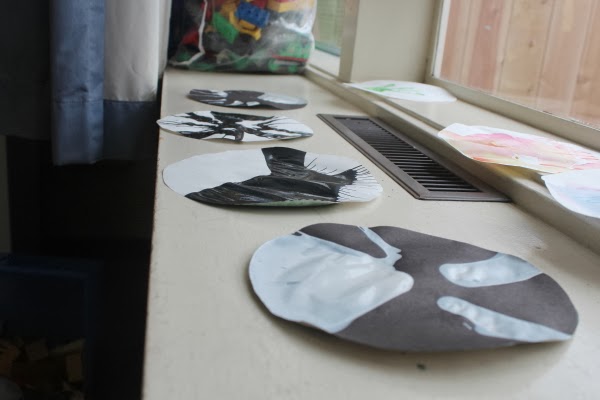
One of the projects we did was to make our own spin art raccoons. First up was a discussion about the different colors a raccoon's fur might be and pulled out some paint to match. We then selected some scrap pieces of construction paper from our scrap box and gathered up our salad spinner and coffee filters. I had also cut out an assortment of triangles and circles to complete our project.


The children placed three coffee filters into the basket of the spinner, we use three because of the viscosity of the paint. It's weight and thickness tend to smoosh the filter into a corner and then all you have is a mess of coffee filter. Using a short stack anchors the filter down and allows the paint to spin about. We used a washable tempera for or paint.


Once the filter was in the basket, the children selected the colors they wished to use and gave great big squirts of paint into the basket (with a little help from me a the bottles were new and not easily squeezable).


Next up was placing the lid onto the spinner which is not as easy for a three year old as it is for an adult, and then turning the handle that spins the basket. This part was really fun and interesting to see how each child would approach it. Our spinner has a crank handle and so the children needed to figure out how to hold the basket with one hand and turn the crank with the other. Some children grew frustrated and asked for help.


After a few checks and maybe more squirts of paint, the children removed their raccoons-to-be and added features.  The thickness of the paint took place of any glue we would need and so eyes and stripes and noses were added by simply selecting their preferred shapes (we used a variety of raccoon images from various flashcards as inspiration) and pressing them down onto the paint with their fingers.


They were quite proud of their raccoons and really into the spinner and so we made another spin art bit just for fun.

Saturday, August 24, 2013

spinning pretty


I had an idea for a crafty preschool project that needed a bit of testing first. After a spin for the project, I let the nephew-a-go-go go for it with my stash of happy paint.


Salad spinner as a painting tool is a favorite of mine. I have done this with twos, threes, fours, fives...sand now a ten year old.


The simple process of placing the filter or paper into the basket, squeezing the paint onto the paper, placing the lid onto the spinner, and then manually making it all spin uses all sorts of both fine and gross motor skills. We've used three different types of spinners at the preschool and each one offers up a bit of a challenge for each child. The cool part is once they master one spinner, they can move on to a different design.


Once all designs have been mastered, you can extend spin art through dialogue, estimations, and predictions. There's also a slew of art and science words you can use. While the nephew a-go-go was going for it, we discussed how keeping it to three colors would keep the art interesting. We spoke of the color wheel and I introduced complementary colors.


We also talked about placement of the paint and how the paint moves to the edges of the paper. I gave him the term centrifugal force and we then talked about that.


But mostly we squirted paint and spun ourselves silly.

Check out this nifty video on color. Yay for Bill Nye!

Tuesday, July 2, 2013

spin some fourth of july art


This nifty doohickey was made from egg carton pieces and beads. Add a bell or two and you can call it a wind chime!

Back in 2009 I shared with you my fondness for spin art. This year I discovered this awesome idea from Not So SAHM via pinterest. I thought the idea of using egg cartons in the salad spinner was brilliant and tucked it away in the noggin for a Fourth of July project. The only problem was I no longer had a salad spinner and so I kept my eyes peeled for one at the thrifts and scored this basic model for $3.25! Cutting it quite close to the wire, I managed to actualize what I visualized and now I have a diy for you!

Materials:
*salad spinner
*egg carton cups
*acrylic, tempera, or biocolor paint
*embroidery thread
*fat needle
*assorted beads
*scissors

The first thing you need to do is liberate your cups from a paper egg carton. This is not a kiddo project as the pulp from the egg carton is a bit wonky to cut. Keep this part for the grown-ups. Sharp scissors work best.
Place egg carton pieces into your salad spinner and add paint. Your kiddos can easily do this and will thoroughly love squirting the paint on top of the egg carton pieces.
Place lid on spinner and have your kiddo give it a whirl or two. There are at least three different styles of salad spinners out there. We use all three at the preschool I work at as each of them offer different challenges to children. Keep this in mind when hunting for a salad spinner. Will your child be able to turn, pump, or pull the mechanism? For toddlers we use a pump model. The pre-k children love the pull model and the threes like to crank away.
Set aside the egg cartons to dry.
While the paint is drying, have your child sort out red, white, and blue beads from your assortment.
When paint is dry, thread a needle with a longish length of embroidery thread. Double the thread and knit it. This will keep the needle from slipping off (I did not double my thread and lost my needle twice).
Begin adding beads. You can ask your child to count out and thread a specific number of beads to practice counting or let them create patterns as they thread away. After they have threaded a series of beads it is time to poke the needle through an egg carton piece. Poke the needle up through the inside of the cup so that the cup faces down over the beads. Add more beads, then another egg carton cup, then more beads, repeating until your child has their desired number of cups and beads on their thread.  Tie of thread into a loop and use scissors to cut off any excess.
 
 
Hang in a happy place and watch it blow around in the breeze. Add bells to the bottom before beading to create a wind chime of sorts.

Happy-almost-fourth!