

Sunday, June 30, 2013
make a popcorn bag garland
Saturday, June 29, 2013
kickstarter: inventing kindergarten

Here's a kickstarter project I urge you to look into. Inventing Kindergarten by Norman Brosterman is one of my most favorite books. It is what clued me in to Frederich Froebel and turned my education focus towards child development and progressive education. The problems that Froebel saw in education 176 years ago have not strayed too far from today's issues. His educational philosophy has had a direct influence on some of our most innovative people in our recent history; Frank Lloyd Wright, Richard Feynman, and Paul Klee to name a few. It is Froebel who brought us building blocks and paper weaving. It is Froebel who made the connection between children and nature, and it is Froebel who demonstrated the concrete learning children obtain from play.
"Play is the highest expression of human development in childhood for
it alone is the free expression of what is in a child's soul."
I am so grateful to Norman Brosterman for writing such a lovely book and am doubly grateful I was able to purchase it the fist time around. When my hardcover copy went missing, I was relieved to find a used one in paperback but those copies are now few and far between. I am proud to say I am able to contribute to this kickstarter fund and encourage you to take a look and see if it interests you. There are only a few days left and he is sadly far from his goal, perhaps we can make a difference and get this book republished. If you have an opportunity to do so, please do and if you have an opportunity to read it, yes, please do! It is that good!
Wednesday, June 26, 2013
make a memory catcher

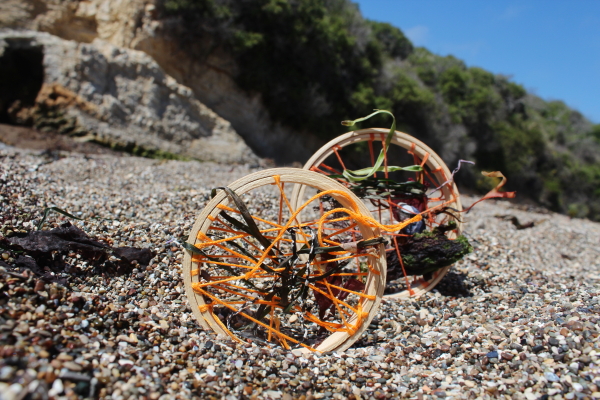
Wrap a long length of embroidery floss around the inside hoop making sure to cross over multiple times. Because the hoop is round, you will want to anchor your wrappings but doing a double wrap every now and then (wrapping your floss around the rim of the hoop twice before stretching it across to the other side), otherwise your floss will slip and your nice spider-webby pattern will just be a jumble of floss.


Tuesday, June 25, 2013
Sunday, June 23, 2013
adventures with ander and zaza: an impromptu pom pom factory


Saturday, June 15, 2013
clouds in a jar you can drink!

Turns out, you can! Here's what you need to make your drinkable clouds in a jar:
*clear empty drinking glass
*clear sparkling water or lemon lime soda
*canned whipped topping
*powdered drink mix in two primary colors (or juice)
*1/2 cup of sugar (if using powdered drink mix)
*1/2 cup of water
*eye dropper
*milk beverage of choice (optional)
*happy straw

To set up this project, fill your clear glass about 3/4 full with soda water or lemon lime soda. We used an empty almond butter jar and soda water.*

Empty contents of powdered drink mix into separate containers. Add 1/4 cup sugar to each and 1/4 cup of water. Mix until all powdery bits are dissolved. If you are using a pre-sweetened drink mix, omit the sugar. You can also use sno-cone syrup, unfrozen otter pops, or juice. If using juice, use two colors that will mix up fun colors. Gatorade could work as well. This is a fun science play project and not even close to being healthy so have fun with it. Just make sure to use small glasses so your kiddos are not too sugared up.

Top off jar with whipped topping and hand your kiddo an eye-dropper. You can find eye-droppers at your local drug store in the pharmacy section. Ours came from American Science Surplus and are glass. Drugstores usually carry larger droppers made of plastic which are easier for small hands to handle. Your kiddos can use the droppers to transfer the juice to the top of the cream. The weight of the juice will sink through the cream and create nifty spirals of color in the soda.

If your colors are deep enough and different enough, your child can see some fun color mixing in the works. After they have had their fill, have them add a little of their favorite milk beverage and you have created a happy creamy drink!

So there ya go, a little bit of mixing, a little bit of science, a little bit of fun, and a lot of tastiness!

*I would recommend using a lemon lime soda or clear lemonade instead of sparkling water as it took a LOT of juice to flavor the concoction.
Friday, June 14, 2013
father's day diy: wooden key chain/gift tag

So you've arted up some gift wrap for Dad's favorite candy bars now all you need is a nifty gift tag. Why not make the gift tag a part of the gift by turning it into a keychain?

Small packs of wooden discs can be found at your local craft store for very little. You can use a hammer and nail to create the hole or get all power tool happy and use a drill with a small bit. Grab a handful of discs and add a hole to each one.

Attaching the keyring can be tricky if your discs are compromised. One of our discs cracked but the rest were good. You can also use a short length of ball chain instead of a classic key ring.

Your children can paint up the discs are get a bit happy with markers.

Aren't they nifty? Happy Almost-Father's Day!
father's day diy: scrape art candy bar bands

This simple gift idea is another small one that packs punch. Why not repurpose your child's artwork into candy bar sleeves? If Dad loves chocolate but always has to share, why not pick up a trio of his favorite bars, just for him?

These candy bands were created using good old fashioned splatter and scrape art. We used one large sheet (11.5"X17") and painted up both sides. After it all dried, we cut it up into three pieces and wrapped each band around a bar. Our first cut was a bit smaller than we wanted but that was easy to fix with a long piece of tape.


The beauty of scrape art is that a few colors go a long way. Drip, drop, drizzle and scrape. That's all you need to do. If the first try comes out too dark or inky, allow the paint to dry a bit and blob on another layer of lighter paint and let your kiddo scrape and push the paint around.


So simple. Paint, scrape, dry, cut and gift! You can also top it with a keychain...that post will be up later today. Happy painting!
Wednesday, June 5, 2013
father's day diy: friendship bracelets


This father's day why not up Dad's coolness factor by knotting up a handful of bracelets for him? Children 7 and up can easily create these small pieces in little time. Change up your cording and create a trio for all the guys in your family...gals too!

The twist on this set of bracelets is to use thicker cord, not yarn or embroidery floss. Parachute cord is nice and sturdy and now comes in all sorts of colors. Hemp cord can be found in the jewelery aisle of most craft stores and shoelaces can be found jsut about anywhere!

Because we are using these thicker cords, you only need two strands (perfect for a pair of shoelaces) or three for the hemp. You can knot your cords at the start though that black starter on the right there really needed a bit more at the top for tying off. If using hemp cord, give it a loop before knotting, this will create a clasp of sorts so Dad can take it off when he needs to. The shoelaces were super thick so I did a loop and ran it through the sewing machine two or three times to anchor them all together.

There are many tutorials out there using embroidery floss. Here is my diy post for using chunky yarn and here is a link to a video that might help as well. I have also found that younger children around 4 and 5 really like to knot things up so you can also set them up with a starter bracelet and let them get to twisting and knotting. I still use the safety pin trick and anchor it to my pants. Some children will get a kick out of it if you anchor it to a table leg or other stationary object.

To finish off your bracelets, you can simply wait until Dad opens them and tie them to his wrist or you can add a fat knot to the opposite end so that it will fit through the loop you created without slipping out. If Dad is not a bracelet wearer, you can also make a shorter "bracelet" and loop it into a key fob. Have fun and Happy Father's Day!
Subscribe to:
Posts (Atom)