Showing posts with label art with threes. Show all posts
Saturday, April 26, 2014
shaving cream prints and shaving cream play
Forget the idea of marbling....the children in my class preferred to experiment with the paint and the shaving cream. It was available all day and a popular center, I think all of one print was actually made...two if you count the one I did.There were jars of liquid watercolor and eyedroppers scattered about. We talked about warm colors and cool colors and the children chose to have one tray of warm colors and one tray of cool colors. They were focused and intent on making sure their trays remained warm or cool. Fingers dipped into the shaving cream along with plastic spoons and measuring cups. At one point the paintbrushes came out and the children attempted to paint on top of the shaving cream. A glass of water was requested when they realized the cream would stick to their brush. For making prints, the children dropped bits of color on top of the
shaving cream then used the end of a paintbrush to swirl the colors a
bit. Next a piece of paper was placed gently on top. Once the paper was
removed the children noticed how completely covered with shaving cream
it was. Small scraps of sturdy cardboard were used to scrape the shaving
cream away revealing the marbled print underneath. It was a joyfully loud morning of investigation and experimentation.
Saturday, March 22, 2014
the three little kittens: painting with wool
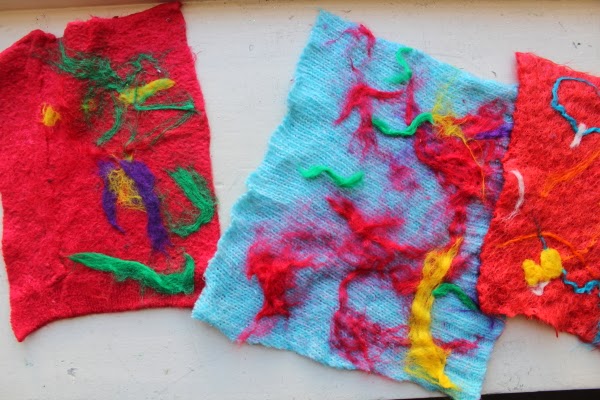
For our second round of all things mitten I brought in a variety of other mitten titles which included this sweet little book that introduces the origins of wool (albeit in a somewhat roundabout way). I thought I would talk about wool and fibers a bit more than I did back when we stitched together our own mittens. This time we brought out our basket of wool pieces and then added a variety of bits of roving. The children then placed their pictures into a zip close bag. We added warm water and a squirt or two of dish detergent, sealed the bag and got to smooooooshing. After that we used our pool noodle pieces as rolling pins and rolled a bit more for good measure before picking up the bags and squeezing them. I had to bring the art home with me for rinsing as we do not have hot water at work (a microwave easily heats up water for us when we need it). I rinsed the art in hot water working the fibers in a bit more then lay them out to dry.
Some wool pieces held onto the roving better than others but overall we had success! The higher the wool content the better grab you will have. The blue one in the center there had only 60% wool and many of the fibers just rolled off. The one on the right was 100% wool and the fibers worked themselves in quite nicely. The children really enjoyed the process and the parents really enjoyed the product!
Thursday, March 20, 2014
drippy icicle paintings
For our week of Snow, even though we live in a town that does not experience snow, we leaped into the idea of snow. All of the children in the class have experienced snow so it went a bit easier in my mind to talk about snow in context with their experiences. I however have not had much experience with snow. I know what it is and I have walked across the snow that remains on the side of the road up in Sequioa National Park and I once spent a morning in Idyllwild when the ground was blanketed in the icy goodness. It was fun all the same. From songs of snow, pretend snowball fights, and snow play dough we really embraced it. Here is a project I did with the children when we were talking about gravity and gravitational pull (thank you shout out to an awesome toddler teacher I once got to work with who taught me this project).
I did a demo first to explain the steps for the children. This was not a free for all art project. I don't even have photos of the finished pieces as the children took them home that very day. We talked about ice and icicles and how they form. As we talked about our ideas of icicles, I drew a line at the top of my paper and explained that we would use gravity to create our gluey icicles.
I wish I had used our boring newsprint instead of the purple paper I used because when I asked the children what color paper they wanted they all wanted to use purple as well. Not a bad thing at all but wonder if had I used the newsprint would they have wanted that as well? When you do this project, use an oversized sheet of construction paper if you have it and fold it in half keeping the crease at the top. This will make the project a bit more sturdy. You may even want to use cardboard and have the children paint their cardboard ahead of time. Ooh, I might do that next year! Have your kiddo draw their glue line near the top. It's their project so try not to correct where they think the top of their paper is. This is a good tool for gauging whether or not your kiddo understands locations...IN, OUT, TOP, BOTTOM, ETC.
After they draw their glue line, have them stand their paper up and let gravity do the work. There will be some dialogue which will invite inquiry and more for discussion. Some of the children had great long lines dripping down their paper while others did not. One of the children figured out how much glue you drew determined your icicle lengths. See? Cause and effect, Awesome!
Next up came the sprinkling of salt and glitter...of course. Each child got their own wee bowl of salt mixed with a hefty does of glitter in their choice of color from silver, iridescent, pink, blue, and/or purple. We used our pinching fingers to sprinkle the glitter across the page.
Some of the children chose to draw additional lines and dance with gravity again. It was a lot of fun and the conversations that carried on throughout the day seemed to focus on the wonders of gravity.
I did a demo first to explain the steps for the children. This was not a free for all art project. I don't even have photos of the finished pieces as the children took them home that very day. We talked about ice and icicles and how they form. As we talked about our ideas of icicles, I drew a line at the top of my paper and explained that we would use gravity to create our gluey icicles.
I wish I had used our boring newsprint instead of the purple paper I used because when I asked the children what color paper they wanted they all wanted to use purple as well. Not a bad thing at all but wonder if had I used the newsprint would they have wanted that as well? When you do this project, use an oversized sheet of construction paper if you have it and fold it in half keeping the crease at the top. This will make the project a bit more sturdy. You may even want to use cardboard and have the children paint their cardboard ahead of time. Ooh, I might do that next year! Have your kiddo draw their glue line near the top. It's their project so try not to correct where they think the top of their paper is. This is a good tool for gauging whether or not your kiddo understands locations...IN, OUT, TOP, BOTTOM, ETC.
After they draw their glue line, have them stand their paper up and let gravity do the work. There will be some dialogue which will invite inquiry and more for discussion. Some of the children had great long lines dripping down their paper while others did not. One of the children figured out how much glue you drew determined your icicle lengths. See? Cause and effect, Awesome!
Next up came the sprinkling of salt and glitter...of course. Each child got their own wee bowl of salt mixed with a hefty does of glitter in their choice of color from silver, iridescent, pink, blue, and/or purple. We used our pinching fingers to sprinkle the glitter across the page.
Some of the children chose to draw additional lines and dance with gravity again. It was a lot of fun and the conversations that carried on throughout the day seemed to focus on the wonders of gravity.
Tuesday, November 26, 2013
turkeys drawn by threes
I asked the children if they wanted to draw some turkeys thinking of our elephants. We sat down with paper and crayons and looked at pictures and illustrations of turkeys. It was decided that a turkey body was a circle, the head was like a thumb, the waddle like an oval and the tail feathers were lines. I love how they turned out. So much fun!
Sunday, November 24, 2013
art on their own time
Saturday, November 23, 2013
guided drawing with three year olds: elephants
We spent a week with Elmer the Patchwork Elephant. We spent a
lot of time on elephants. The different types, their color, habitat,
etc. In the book we talked about how most of the elephants were grey
except Elmer and one of the children asked "What is grey?" And so we
made our own elephants.
Next I talked about our previous color mixing experiences and how we made tints by adding white. I explained that grey is made by mixing black and white. I let them squirt their black and white paint onto a tray and then had them choose one other color to mix in. As they were mixing, one of the children told me "this is a tint of black!". Before painting, we flipped the drawing over so that the children would paint the back of the paper to allow me to cut around their drawings.
Painting in action! We would hold the paper up to the light to see if we could still see the lines of their drawings If they did, they would add more paint. This one here has a little bit of red paint mixed in.
Subscribe to:
Posts (Atom)