
 See? One pack of googly eyes makes for a whole lot of fun. Here, I have used the googly eyed circles from thursday's project and added them to a garland made from fabric scraps for some happy Halloween decor.
Materials:
*10 or more googly-eyed circles
*16 or more lengths of fabric 6-10" long by 2=4" wide
*yarn, about 6-8' long
*sewing machine (preferred but not necessary**)
*glue stick or glue
If you haven't made your circles, go set your kidlets up with the supplies and have them go to Halloween town. My garlands used half googly eyed circles and half without (I ran out of googly eyes).
Cut or rip your fabric pieces into various lengths and sizes within the measurements above. You can make them larger or smaller, these were just the sizes that I used. They do not have to be perfect, in fact, rippety, frayed edges adds more spook-a-bility to the whole thing. If you choose to attempt this sans sewing machine, make your scraps 12-15" long as they will need to be knotted to the yarn.
Set up your sewing machine and stack your fabric scraps in the order you wish them to appear on the garland. Pull out tail end of yarn from ball and fold over end about 4" to create a loop shape. I like to work from the ball of yarn so that I can space my fabric pieces as whimsically as I feel without worrying about running out of yarn. You can of course cut your length of yarn first, just keep an eye out for spacing and then the end. which will need a loop as well.

 Place under sewing machine foot with a length of fabric folded over the yarn, catching the end of the loop within its fold. Use a long zig-zag and do a couple of back stitches once your needle hits the fabric and continue on, making sure to catch yarn in between the fold.
 Continue stitching past fabric and along yarn. The zig-zag of the stitching will embrace your yarn as you move along. Stitch between 6 & 8" before gently sliding in the next folded fabric scrap. I found that stitching for another four seconds worked nicely and kept all my spaces fairly even. This may seem kinda trying but after your fourth or fifth foray into adding the fabric, you'll set up a momentum that makes the stitching go by lickety split!
 Continue stitching your fabric scraps onto the yarn. Stacking them ahead of time will help make the assembly line move quicker. Cutting/tearing your scraps into a variety of lengths adds to the overall look of the garland.
When you are about eight inches from the other end (or at your last piece of fabric), make sure to loop that end and catch it under the fabric fold so that you have two loops at either end of your garland. This will make it much easier to hang but you can always leave a long length of loose yarn to tie to whatever it is you are going to hang your garland from. Don't forget to back stitch on that last piece, otherwise all your work may unravel and that would hardly be fun.
 Next up, have your wee one select two of their arted up googly-eyed circles. Add a smidge of glue to the backside of one circle and get ready to place it on the stitched-up garland. To do so, have your tot hold the glued up circle to a length of yarn in between fabric scraps, glue-side facing yarn and then an ungluey circle (googly eye facing out) on the other side so that you make a sort of yarn sandwich. I left the first two yarn spaces at each end circle-free so that they wouldn;t get hidden once you hang your garland up. Plus, this means you don;t have to make as many circles.
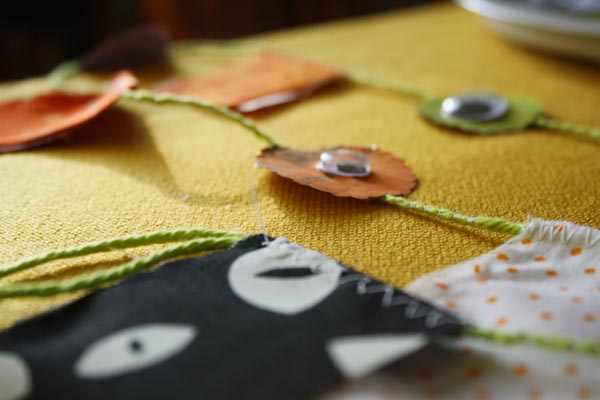 Continue until all the spaces between the fabric scraps are filled, one circle sandwich between. My garland alternates with a googly eyed circle and then one that has a green circle. Making your circles two sided allows for pretty visibility when hanging as garlands are wont to twist and turn a little. Work flat and allow glue to dry thoroughly before hanging. Ta-da!

 **To do this sans sewing machine, cut your lengths of fabric much longer and knot them to the yarn with 6-8" of yarn in between. Glue googly-eyed circles on just like above, allow to dry and you're done! Happy haunting!
 ***or, if you don't feel up to making your own, you can pick one up in my shop! hint hint nudge nudge wink wink.


