Showing posts with label garland. Show all posts

Tuesday, February 12, 2013

make a fingerprint heart garland


with a little help from your favorite grown up! Catch the diy at scrumdillydilly! Kiddos can stamp their fingers, punch* and add glue. 

*paper punches can be difficult to push for youn children. I like to use the kind with a large "button" where your child can use their hole hand for pushing. Smaller punches that use just a finger button usually prove too difficult even for your older kiddos. 

Saturday, December 22, 2012

make a marshmallow garland

This super easy garland project can be whipped up with even your young twos and threes. A plastic needle is extra long and should both prevent poking and swallowing. This project will work those fine motor skills and get the creative juices flowing when given a variety of marshmallows and straws to play with. If you talk to your kiddo about creating a pattern with their straws and marshmallows you've just added math to the mix. Here's what you need.

Marshmallow and Paper Straw Garland
*large marshmallows
*plastic needle
*waxed dental floss
*paper straws
*two pony beads or buttons
*scissors
Gather up your marshmallows and pop them into a pretty bowl or two. Hand your kiddo a pair of scissors (if they're scissors ready) and let them cut up their paper straws. Set the cut straws into their own happy bowl and set aside. I have found paper straws at Michael's, Target, and online. If you cannot find paper straws, plastic straws will work and can be found in many different colors.
 Thread your plastic needle (I found mine at Michael's) with a long length of dental floss that has been double knotted. You want to use dental floss to keep the line as unsticky as possible (it will still be gooey as marshmallows are magically gooey). The plastic needle will easily poke through the marshmallow and is sturdy enoug for little fingers to thread through the cut star pieces. Tie one of your buttons or beads to the end and get to threading. Here is where the patterning comes in. You can ask your kiddo to create  a pattern of two or three and then have them thread it. As they thread the pattern (red, green, marshmallow) talk about repeating and patterning. Use their example but mix it up and see if they can find the mix-up. 

 Once finished, tie off the other end with the remaining bead or button. Hang in a happy place. Merry Christmas! 

Friday, December 7, 2012

make a dreidel garland

Have any neckties up for grabs? Turn those bits of swanky silk into a nifty dreidel garland. This fun project is easily created with scissors and glue. Here's what ya need:

Dreidel Garland
*eight neckties (old or thrifted)
*scissors
*tacky glue
*clothespins
*ribbon
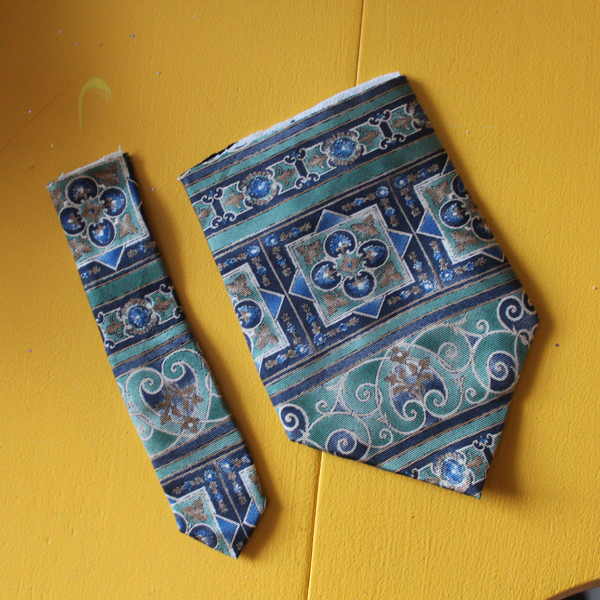
 Gather up your neckties. I used eight to celebrate each day of Hanukkah but you can choose to use more or less. A single necktie would make a lovely dreidel decoration that can be hung on a doorknob or wall. I collected my neckties from various friends and thrift stores.  If your child is on the wee side (say younger than eight) you will want to cut the fat end of each necktie away from the rest. About eight inches is a good measure. If your child is scissors capable, they can cut off the skinny end of each tie about six inches long. If you wish to add some math fun to the mix, have them use a ruler to measure and a piece of chalk for marking. Mark on the back part of the tie in case the chalk decides to linger. 
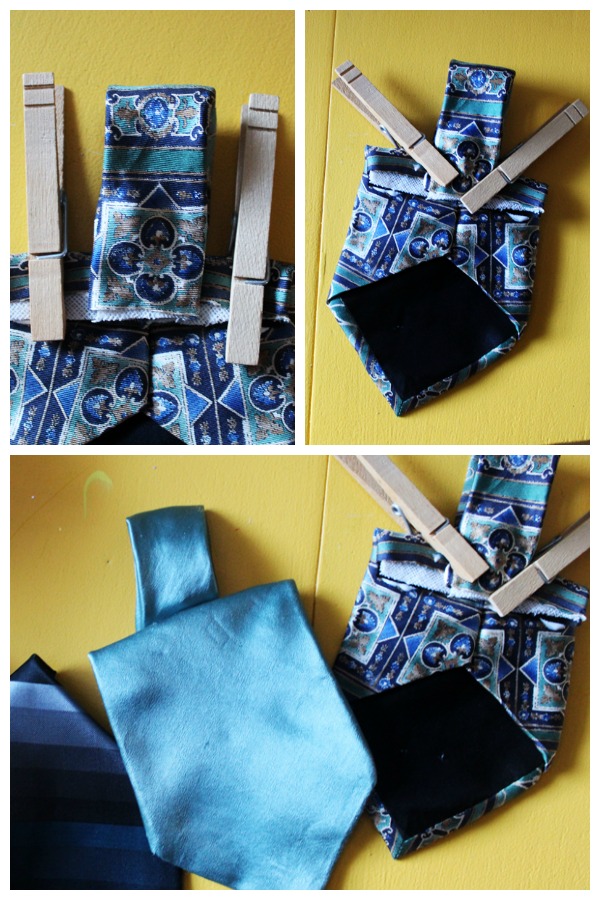
Flip each large tie piece over and have your child draw a line of glue along the top cut edge. Tacky glue works best but you can use good old fashioned school glue as well. If you liberated the fat end of the tie before the simple stitch that holds all the folds in place you may wish to add a dab of glue or so to the folds as well. Once the glue is along the cut end, carefully fold the edge over and use a pair of clothespin to anchor until the gue dries. All those layers of silk and such will want to pop away from the glue so don't forget the clothespins. If you do not have clothespins, use a sheet of wax paper on top of the glued bits and plop a large book or two on top until dry.
 After all of the now almost-dreidel shapes have been glued it is time to make the dreidel tops. Pick up a cut skinny end, draw a line of glue along the cut end and fold over but not all the way to the edge. Next, add a blob of glue along the new bottom, flip over and center onto the back of the dreidel shapes. Rearrange the cothespins to anchor down the tops and set aside to dry.
 Once dry, cut a length of ribbon and thread each dreidel onto it. Hang in a happy place and enjoy! 

Sunday, December 11, 2011

Homemade Holidays: make a mini yarn garland

 Happy December friends! Here's a nifty, easy (with a wee bit of wait time involved) garland project that can be adapted for any holiday. This year, I am using it for Christmas but change the color of the yarn and it can become a New Year's, Valentine's Day, Halloween or Hanukkah garland as well. Your kiddos will enjoy making this as it involves that delightfully messy and sticky stuff we know as glue. Tink kiddos will fully immerse themselves into the goo but your older kiddos can have a go at working those fine motor skills as they wrap that yarn around something smaller than a balloon. Don;t forget to cover your surfaces, this can get messy.

Materials:
*5 or more plastic eggs that open
*yarn
*scissors
*plastic wrap
*wax paper
*white glue or mod podge
*sequins, buttons, happy beads or old costume jewelry bits
*4 or more mini ornaments (optional)
 Lay a sheet of wax paper over your work surface area and have your kiddos separate those eggs.
 Hand your kiddo a pair of (kiddo safe) scissors and let them cut up the yarn into a series of smallish lengths 3"-8" inches. This does not have to be exact. One long length (about 10") is enough for one evenly wrapped egg half but we're giving this project to our kiddos to do so they may prefer working with smaller lengths. Dump the yarn bits into a shallow dish with a healthy amount of white glue or mod podge and allow to soak in.
 
Wrap each egg half with a bit of plastic wrap, tucking the ends and edges up into the egg cavity. You can tape into place if you like but if you get a good bunch of wrap tucked under, it should remain in place as it sticks all over itself.
To begin wrapping, your kiddo(s) can pick up one piece of yarn with one hand while using the thumb and pointer finger of the other to squeeze excess glue out. Plop the sticky strand atop a plastic covered egg half and wrap around. Repeat with more yarn until satisfied. your kiddo can do an even wrap if they are older and more in control of their motor skills or they can do a wonky, squigglely wrap. The nifty thing is that the egg halves are so small, they won;t need a lot of yarn to cover.
Continue until all egg halves are covered and set aside to dry over night. The damp sponge is there for your kiddos to wipe excess sticky from their fingers as they work. I used the smaller, more round halves of my plastic eggs but you and your kiddos can use either/or or both. If you do not have eggs, try using an upside down egg carton covered in wrap or small round bottomed cups.
 
 
When dry, remove plastic and yarn from egg half. It should easily be separated from the egg. Next, and I suggest you do t his part, gently hold the yarn magic in one hand while pulling away the plastic wrap with the other. If there are dried blobby bits of glue, you can use your scissors to trim a little.
 
 
Hand your kiddo a bottle of tacky or craft glue and a small assortment of buttons and baubles and have them glue one happy bit into the cup of the yarn (like a nest...ooh...use brown yarn and make a spring bird and nest garland. I think I will do that!) They can of course glue more than one happy bit or if they are of the age where the baubles and bits may end up in their nose instead, let them shake a bit of glitter on top and set aside to dry.

Once everything is dry it is time to assemble garland. Cut a long length of yarn at least six feet and thread your yarn cups on. If you like you can alternate with a pretty ornament in between. I made a separate mini ornament garland and looped them up together when I hung them. Once you get the first cup on, double loop and knot one end of the yarn to anchor it in place. The first cup will be the one to keep the rest from slipping right off. To keep the whole shebang from crashing into each other, loop the yarn through each happy bit twice kind of like a running stitch, over, under and over again and on into the next one. If the yarn is too sloopy, use a small square of tape to pinch off and taper the end.
 
Once you are finished, loop and knot your ends for ease of hanging and find a nifty place to showcase. Have fun and I'm here if you have any questions!


Saturday, July 2, 2011

make a july 4th garland!

 I designed this project for craftzine for us crafty grown-ups but you can totally tweak it so yer wee ones can play as well. They can paint up the bunting bits after you have added the tap as well as smoosh up the cupcake liner and glue things in place. The how to can be found over  at craftzine.

Friday, October 22, 2010

Halloween Fun with Grow Capsules

aka another day, another garland...I can't help it. I'm a little dotty for garlands and these are really easy to make. Plus they're inexspensive and would be the perfect size to hang up on your wee one's headboard.

Materials:

*one pack grow capsules
*needle & thread
*container of warm water
*splash friendly work area
*buttons and/or beads optional
*paper punches or halloween stickers
*scrapbook letters, also optional
*glue stick

scrumdilly-do it:Set out bowl of warm water and have your wee ones drop their capsules in the water. Lately I have been seeing these little grow capsules EVERYWHERE. I see them at birthday parties, craft stores, the dollar bin at Target, and even Urban Outfitters. These may be an American thing, I don't know but what they are are small foam shapes stuffed inside a gelatin capsule that dissolves in water leaving you with a happy foam shaped bear, ghost or whatnot.The hotter the water, the quicker the gelatin capsules open but don't make the water too hot so your wee one can poke a finger or two in the mix and swirl them up a bit. Play a guessing game as to what shape they think each color is going to be. To hurry things along, they can even rub their fingers back and forth over the capsule. When sponge shape is free from capsule, remove from bowl making sure to squeezey, squeeze, squeeze out excess water. Set aside until the rest are done.

If you choose not to make a garland, these small shapes make excellent sorting and counting manipulatives. The more the merrier, have a special place to place all your foam shapes and start up a collection. Or, whip out that needle and thread and begin stringing.

Have your wee ones arrange shapes in the order they want them to appear on their garland. This is a great opportunity for pattern and seriation, don't rush them. Once they are ready, thread needle with a length of thread about six to eight feet long, don;t worry, you are going to pull that needle to the middle of the thread so that your two ends will be knotted and your thread will be doubled. Take a button or bead and knot at one end about six inches from the end. This will be the anchor so the foam shapes don't slip off. all of my beads and buttons are in storage so I made do with a simple, lonely knot. You could do that too if you wish then your knot and my knot could be penpals.Pick up first foam shape and pokey, poke, poke with the needle as if you were slicing in half and carefully go through the whole shebang. Your child CAN do this most definitely as long as they rock their fine motor skills. Needles are sharp and they may poke themselves so if you feel anxious about this, try a plastic needle or do the poking part yourself.Continue until all shapes are on the thread. Have your child arrange the spacing between the shapes so that they are not all jumbled at one end.Add finishing touches such as googly eye circles, Halloween stickers or other scrap happy doodads. I added B O O using chipboard letters from the craft store glued onto some paper circles I had leftover from the cupcake toppers and googly garland projects.Tape up to your wee one's headboard, the front door or over the mantel, pull out a Halloween book or two and enjoy!

Tuesday, October 19, 2010

fun with googly eyes part three: halloween garland

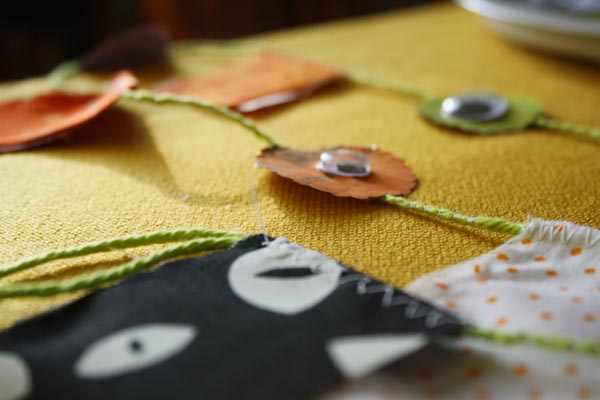
See? One pack of googly eyes makes for a whole lot of fun. Here, I have used the googly eyed circles from thursday's project and added them to a garland made from fabric scraps for some happy Halloween decor.

Materials:
*10 or more googly-eyed circles
*16 or more lengths of fabric 6-10" long by 2=4" wide
*yarn, about 6-8' long
*sewing machine (preferred but not necessary**)
*glue stick or glue

If you haven't made your circles, go set your kidlets up with the supplies and have them go to Halloween town. My garlands used half googly eyed circles and half without (I ran out of googly eyes).

Cut or rip your fabric pieces into various lengths and sizes within the measurements above. You can make them larger or smaller, these were just the sizes that I used. They do not have to be perfect, in fact, rippety, frayed edges adds more spook-a-bility to the whole thing. If you choose to attempt this sans sewing machine, make your scraps 12-15" long as they will need to be knotted to the yarn.

Set up your sewing machine and stack your fabric scraps in the order you wish them to appear on the garland. Pull out tail end of yarn from ball and fold over end about 4" to create a loop shape. I like to work from the ball of yarn so that I can space my fabric pieces as whimsically as I feel without worrying about running out of yarn. You can of course cut your length of yarn first, just keep an eye out for spacing and then the end. which will need a loop as well.Place under sewing machine foot with a length of fabric folded over the yarn, catching the end of the loop within its fold. Use a long zig-zag and do a couple of back stitches once your needle hits the fabric and continue on, making sure to catch yarn in between the fold.Continue stitching past fabric and along yarn. The zig-zag of the stitching will embrace your yarn as you move along. Stitch between 6 & 8" before gently sliding in the next folded fabric scrap. I found that stitching for another four seconds worked nicely and kept all my spaces fairly even. This may seem kinda trying but after your fourth or fifth foray into adding the fabric, you'll set up a momentum that makes the stitching go by lickety split!
Continue stitching your fabric scraps onto the yarn. Stacking them ahead of time will help make the assembly line move quicker. Cutting/tearing your scraps into a variety of lengths adds to the overall look of the garland.

When you are about eight inches from the other end (or at your last piece of fabric), make sure to loop that end and catch it under the fabric fold so that you have two loops at either end of your garland. This will make it much easier to hang but you can always leave a long length of loose yarn to tie to whatever it is you are going to hang your garland from. Don't forget to back stitch on that last piece, otherwise all your work may unravel and that would hardly be fun.Next up, have your wee one select two of their arted up googly-eyed circles. Add a smidge of glue to the backside of one circle and get ready to place it on the stitched-up garland. To do so, have your tot hold the glued up circle to a length of yarn in between fabric scraps, glue-side facing yarn and then an ungluey circle (googly eye facing out) on the other side so that you make a sort of yarn sandwich. I left the first two yarn spaces at each end circle-free so that they wouldn;t get hidden once you hang your garland up. Plus, this means you don;t have to make as many circles.
Continue until all the spaces between the fabric scraps are filled, one circle sandwich between. My garland alternates with a googly eyed circle and then one that has a green circle. Making your circles two sided allows for pretty visibility when hanging as garlands are wont to twist and turn a little. Work flat and allow glue to dry thoroughly before hanging. Ta-da!**To do this sans sewing machine, cut your lengths of fabric much longer and knot them to the yarn with 6-8" of yarn in between. Glue googly-eyed circles on just like above, allow to dry and you're done! Happy haunting!

***or, if you don't feel up to making your own, you can pick one up in my shop! hint hint nudge nudge wink wink.