Showing posts with label glue. Show all posts

Friday, September 11, 2015

press here collages

Another year, another group of awesome collages inspired by the book Press Here. I wish I had photos of the set up (it was a provocation), but the kiddos jumped right in and I had no time to grab the camera! I had the materials at the art table all pretty and laid out but I think it was the glue stick that drew them in. Either way, our collages are up on our art wall making the classroom an extra cheery space!

For more Press Here inspiration click here, here, and here! Have fun!

Friday, October 11, 2013

sometimes you just need to squeeze


If you have ever worked with small children you may be familiar with their fondness for glue. They will use as much as you give them and then some. Often, you will have an idea for an art or craft project that involves liquid glue and pretty pieces of paper or other colorful bits and pieces. You have a gleam in your eye as you imagine all the beautiful arting and crafting the children will do and then you hand them the glue and well.....everything changes.

And it is all good. Adults present an art opportunity to well...create art but really what happens is the magnificent exploration of the supplies at hand. Be it beads, colored pasta, strips of paper, play dough, or glue, children need to figure out how it all works on their own.

My three-year-olds had their first art project that involved liquid glue in a bottle. I wanted to give them an opportunity to use a variety of adhesives and so we worked with glue sticks first, then our white glue that comes from a brush bottle where a paintbrush is built into the lid, and then the squeeze bottles came out and sure enough, all other adhesives were abandoned.

The very act of squeezing that bottle is so enticing and exciting, how can we really expect a young child to stop and why should we? Art with young children really is about the process and squeezing a bottle of glue silly is one fantastic process.

I do have a trick involving the glue however and that is that each child receives their "own" bottle of glue. They can use as much or as little but when the bottle is empty and all squeezed out, the glue shop is closed for the day and we move on to another project of their choosing which often involves the washing of some classroom item with oodles of soapy bubbles and plenty o colorful sponges that need to be squeezed out.

Thursday, May 16, 2013

crepe paper banners!


This is a project I created for scrumdillydilly but I think it can easily be translated into a kid happy craft as well.

Materials:
*index cards or equal sized scrap paper
*5-6 colors of crepe paper streamers
*scissors
*glue
 
To make this kid-happy give them a smaller of piece of paper to work with. If you have a small group of children this will be even more fun as you can see what each child chooses to create. Hand out paper and scissors and set out pre-cut lengths of crepe paper (for kiddos 6 and under) and small bottles filled half-way with glue*.

Scissors-ready children can fold their streamer lengths in half and give them some fringe, older children may be able to scallop if the wish and younger children can leave their streamers as-is. Once they are ready for glueing, hand them their glue bottles (glue sticks will work as well if you prefer) and let them get to work. 
 
If you would like to demonstrate how it is done, begin a discussion using a finished flag and ask the children how they think it was created. You can point out how to work from the bottom up if you really wish for your child to create this specific style but if you leave them alone to create they may surprise you even more. By discussing the project, you are giving your children a dialogue rich in vocabulary and problem solving. You can discuss color theory as well by pointing out a rainbow patter or asking the children to use cool or warm colors. Kick it up a notch and see if the children can create an ABABAB or ABCABCABC pattern in their layering. 
 
Using scissors and squeezing glue bottles promotes both fine and large motor skills as well as self-control. There are all sorts of educational aspects to creating arts and crafts with children. It really is my favorite part of making art with children. All that process makes me very happy. After each child's flag has dried, you can flip them over and trim any excess bits that hang over the edges. Don't trim if your child insists they wish them to remain that way. Hang them along a length of ribbon or string with clothespins and throw an impromptu fiesta complete with cupcakes! 
 
 
 *as a preschool teacher and early childhood art teacher I have found that some children cannot resist squeezing out an entire bottle of glue. If you hand them a small mini bottle such as this or this that is only filled halfway, you can control the gluey-mess a smidge and teach your child a little about control by saying "This is your bottle of glue. When it is empty, it is empty and that will be all the glue for this project." This works most of the time but sometimes there are a few freak outs. When that happens we acknolwedge the child's disappointment and invite them to problem-solve their own solution without giving refilling the glue bottle. After a few rounds they begin to learn more control over the amount of glue they use. Some children however do not seem perplexed over the lack of glue and simply wish to continue squeezing.

Sunday, October 28, 2012

halloween: make a glittery spiderweb garland


There are three days left until Halloween, just enough time to create this nifty spideriffic garland. All you need is yarn, glue and glitter. This is a project you will need to work on with your kiddos. Your kiddos can practice their cutting skills by cutting the lengths of yarn, they can also pour the mod-podge or glue and dump yarn into the mess for saturation. They may also a go a tad bit wild with the glitter, have fun! 

materials
*white glue or mod lodge
*yarn
*glitter
*wax paper or plastic wrap
*pencil
*yogurt lid, compass or other circle to use as pattern
*scissors
*shallow dish

Grab your wax paper and lay out a sheet on a surface where it can camp out for a day or so. Use a ball point pen or pencil to trace or draw a circle about six inches wide. Draw at least five for your garland so it won't take forever for your webs to dry. 
Pour your mod-podge into a shallow bowl. If using glue, mix your glue with a little water to thin it out. Cut a series of short lengths of yarn. You will need five for each web, four about the same length and one a couple of inches longer. My strands were 3" and 6".
 Dump all your yarn strands into the sticky mess. To create a web pick out one of the sticky soaked yarn strands and pull of excess mod-podge using your fingers. Lay the first strand across a circle, add your second strand across the first and repeat with the next two strands to create a sort of asterix/star shape. Alternately, you can try to craft a web as you see fit or your kiddo can mound a stringy mess to their delight. Set aside to dry for at least four hours. Drying time and sturdiness of your webs depends on the goopiness of your yarn when you begin.
Once dry, use a paintbrush to paint on a bit of glue to the surface of your webs. Sprinkle a bit of glitter on top and set aside to dry for one hour. 
Once dry, gently peel back the wax paper to reveal your web. If you have extra blobs of dried glue in between the strands of your web, use a pair of scissors to trim. To create your garland, cut a length of yarn at least three feet long and thread your webs onto it. You can tie loops at each end for hanging or use a couple of pieces of happy tape to affix to your wall. 

*Yikes! I thought I took photos of each step but I did not. I hope you enjoy this project any way, thank you!

Friday, March 16, 2012

make crepe tissue rainbows

 For this project, we're going a little old school by wrapping small squares of tissue around the eraser-end of a pencil. To update it, we're using crepe paper streamers instead, they are much easier to cut into small squares. So easy, your kiddos can even do it!

Materials
*crepe paper streamers in rainbow colors
*large yogurt lids or other round bases
*white glue
*pencil with eraser-end
*hole punch
*cotton balls
*yarn or string
Gather up your supplies and have your kiddos cut long strips of streamer into smallish squares.
 Use a hole punch to punch a hole out of your yogurt lid. I like using yogurt container lids as they are a smidge larger than small but not so large, children lose interest in filling them. You can also use cardboard or sturdy paper cut into circles but the lip on the lids will corral all that sticky glue.
 
Squirt a happy amount of glue inside the lid and have your kiddos use their fingers to spread it around. Some lids may resist the glue, you can sand down the surface with a bit of sand paper if you like. This will help the whole thing stick better and last longer.
 
To create a rainbow, have your kiddos wrap a red square of tissue around the eraser of the pencil. Next, while the tissue is still wrapped, flip pencil over and push it against the glue filled lid. Slowly pull the pencil away from the tissue and you will leave behind a happy tissue flair. Repeat with the red and arc across the top part of the lid creating a rainbow shape.
Continue with each color in rainbow order (or not). Notice how each arc grows smaller and smaller? Dialogue with your kiddos and see what observations they make.
 
After the last arc is in place. Give your kiddo a cotton ball to tear into smaller pieces. Place the cotton "cloud" at the bottom of the rainbow and set side to dry.
Once dry, loop a length of ribbon, yarn or string, through the hole-punched hole and hang in a happy place!You can also let your kiddo glue their rainnbow squares however they like to create a happy party of color!

Friday, February 8, 2008

Repurposed Art: Puffy Hearts


You can also do this ahead of time with blank paper and have your wee ones art them up before stuffing and puffing them...it's up to you.

What you need:

*your kidlets artwork or blank paper
*scissors
*white glue
*clothespins or paper clips
*recycled plastic bags, grocery, produce, bread, etc.
*paint, chalk, markers, etc. if using white paper.
*ribbon, string, yarn
*stapler or hole punch

scrumdilly-do it:

Gather up your supplies. Cut up your wee one's artwork into two or more equal sized squares. If you are using a large sheet of paper, fold it into quarters. If you are using white paper, do the same.Cut out a heart shape through the layers of paper. You will be able to make half as many puffy hearts as their are cut shapes. Two hearts for each "pillow". If you are using blank paper, make your hearts as large as possible so allow your wee one's ample creating space. If you are having your wee ones repurpose their own artwork, you may want to draw a heart shaped template for them or if they are able to, have them draw their own template.Apply glue to the "wrong" side of the repurposed heart just around the edges but leaving a two inch space. The opening will allow you to "stuff" your puffy hearts.Place the companion heart, "right" side up on top of the glue-y heart, add paper clips or clothes pins to the edges to help secure. Set aside to dry.Once dry, if you are using white paper, now is the time for your kidlets to art them up. If you are using paint, set the hearts aside to allow the paint to dry. If you are using repurposed art, it is time to "stuff" 'em up. Get your plastic bags and cut into manageable pieces. I used three quarters of a bread bag for one 8 inch heart. Squish 'em up and push into the opening.Add glue to the edge to seal and use your clips to hold it closed.Once dry, staple a ribbon, string or yarn loop to the top. You can also use a hole punch. You now have a nifty Valentine's Day ornament for your front door, door knob or what have you. Give a little love to your friends and family, Happy Heart Day!

Tuesday, January 22, 2008

Pop Happy for Popcorn Day!

Happy Popcorn Day! Here's a nifty bit of artsy-ness that includes a wee bit of recycling and a whole LOT of glue!
What you need:
*white glue (or colored glue)
*food color or liquid water color (or colored glue)
*popped popcorn
*pom-pons or other collage-able fun
*glitter
*tape
*wax paper or splat mat
*clear plastic lids like the kind that sit on your frappacino

scrumdilly-do it:

Set out your materials on a sheet of wax paper or your handy dandy splat mat (a couple of plastic placemats will work in a pinch). Prep your colored glue. This part will work best if you can make a couple of bottles of colored glue to have on hand. Kidlets can of course use a paintbrush to use the glue as paint but what fun is that? It's all about the SQUEEZING! If you can, pick up a couple of the tiny bottles of white glue. Back to school time is great for discounts but you can always pick up a couple of larger bottles at the dollar store. Add a few drops of food color or liquid watercolor, put the cap back on and shake, shake, shake! Rest the bottles upside down to help get the color mixed into the glue. If you have a small squeeze bottle floating about, mix up your wee one's favorite color into some glue and have them use that. Remember, kidlets will use as much glue as you give them so keep the quantity down othrwise you will have a mountain of glue dripping all over the place. Not only would that be wasteful, it would be MESSY! You don't have to use a clear plastic lid but the clear plastic will allow for pretty sunlight to stream through if you choose to hang this piece of art. A yogurt lid or any other plastic lid will work but if you are a person who hits Starbucks quite often, these lids are PERFECT! Flip your lid over so that the top faces you. Tape up the straw opening with a couple of pieces of tape and flip over so the top is resting on the table.Now it is time for the first batch of glue! Have your wee one squeeze as much glue as they like into the lid. If you have the lid facing the right way you will have a small lip to hold the glue in. The goal is to coat the bottom of the lid with glue.If your wee one is getting a little too glue happy, cut them off by handing them a bottle of colored glue. Encourage them to squeeze a little color into the lid also.Next up is popcorn! While I am sure you and your wee ones are snacking away on the popcorn, don't forget to add some to the lidful of glue, a few pieces at a time. The idea is to layer. Glue, popcorn, glue, popcorn, etc. So go ahead and add some popcorn to the mix...Add some more glue in a different color perhaps and then add a dash or two of glitter, add some more popcorn, more glue, pom-pons and what have you. Eventually your wee one will decide he or she is done and their lid will look a little something like this:Set aside overnight to dry and check back here for the next step. Mine is still all gluey so I have to wait also. Make sure to have more than one lid on hand so that your kidlet can make a couple of these. Experiment with other disposable items. You may want to use the plastic container the lettuce came in just cut the sides down a little bit and tape up those holes! Have fun!

Revisit last year's links:
Popcorn themed books
Other popcorn related fun!

Thursday, August 30, 2007

A little textured fun...

with glue!
This project is best done on white paper, card stock, paper plates, etc. I wouldn't bring it out and hope to accomplish it all at one time since there is a lot of drying and waiting to do. What you can do is bring out the glue and the paper and make nifty glue pictures. Set them aside to dry and finish up in a day or so.

What you need:
*white glue that dries clear
*white surface for gluing. Paper plates or heavy paper are perfect
*watercolor works best but tempera will work also
*paint brushes or sponge painters
*containers for paint if using liquid paints
*covered surface for painting
*flat surface to dry artwork

scrumdilly-do it!

Set out your splat mat or cover your work area and pass out the paper or plates. Hand your kidlets a bottle of glue and let them have a go at it. Draw pictures or swirly designs, it is totally up to your wee ones! You can use a pencil to create an outline but know that though the glue covers it when it is wet, once it dries, the pencil lines will show through. *if doing this with toddlers or glue happy kidlets, I pass out tiny glue bottles. Pick up one for each kidlets and refill from a larger bottle. I've noticed that the wee ones will use as much glue as you give them so if you start small and let them know that the glue bottle is theirs and once it is empty it is empty for that project, everything should work out fine unless of course you have a mad happy glue fiend then I suppose patience is your best bet.

Once your kidlets are done with their glue pictures set aside to dry at least until the next day. If I know kidlets, they will have covered their surfaces with super thick gooey piles of the stuff and that takes a long long time to dry! If you need to distract your wee ones from their pictures and they are glue happy and age 4 or up, let them paint a hand with the glue and have a peeling contest. Remember how much fun that was? When the pictures are dry, set out paint and brushes and have your wee ones paint over their glue art. The paint will cover the glue and create a textured design. Experiment with different paint. What does thicker paint do? Watercolor? What about water with a drop of food color in it? Will markers cover the glue? Whatever you do, have fun and let your children be your guide!

Thursday, July 26, 2007

Tin foil festive...


 This simple and slightly gooey activity has such eye pleasing results why not do it over and over and over again?

What you need:
*tin foil what ever size ya like (I reused a clean smallish piece from take-out)
*glue
*water
*paint brushes and sponges
*tissue paper scraps
*glitter, sequins, plastic jewels and/or other collagable fun
*work surface


scrumdilly-do it:

Give your kidlet a sheet of tinfoil. You can wrap the foil over a piece of recycled cardboard or keep it on a tray or cookie sheet for easy mobility. You will want a sturdy surface underneath when your wee gets all glue happy. With the foil, set out a shallow dish or bowl of tissue paper scraps, either cut or torn. You will also want to set out a small cup of watered-down glue, a paintbrush (a sponge brush works wonders) and some collagable bits.


If you are brave, set out the supplies and let your wee ones have a go. For the not so brave I have broken it down into steps of a sort.
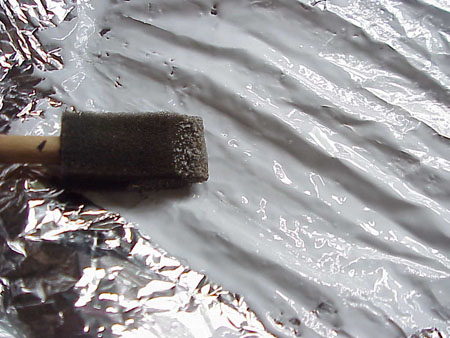
 First, have your wee one squirt glue all over their foil.

 Using a damp sponge or sponge-brush, have your kidlet blend the glue so that the foil sheet is COVERED.

 
 Next up, let them go paper crazy with the tissue, placing their pieces wherever they like adding some watered down glue for more stickability and to allow for layers.


 Once they are done with their tissue work they can add glitter, sequins, etc. Set aside to dry and enjoy when it is done!


These would make for awesome cards for family and friends. Once dry, glue to the front side of a blank card and cut down to size. Have fun!