Showing posts with label tutorial. Show all posts

Sunday, February 13, 2011

valentine's day (or any day) ::::::::::::::: moustache love

"Why, hellllooooo there.  You arrrrre loooking verrrrry bee-oo-tiful.  
Would you be my Valentine?"


Here's a silly, speedy (and sugar-free!) Valentine's (anytime!!!) project that is certain to stand out in a classroom mailbox full of Transformer and Jonas Brothers Valentines!!!


These hilarious handlebars would also make excellent quickie-costumes, father's day gifts, and/or party favors, and can be made in whatever color scheme your kidlets prefer.


You will need:
*2 or 3 sheets  (8.5" x 11") of stiffened felt in Valentine's colors (ours was glittery!) -- by why limit yourself?  'traditional' hair colors or rainbow-brites would be just as suave!
*Coffee stir-sticks (we 'borrowed' ours from our local branch of a coffee mega-chain.  ahem.), popsicle/craft sticks.  We considered using dowels, but worried that they might be too poke-in-the-eye-prone...
*Hot glue or craft glue (if you have some extra time for drying or are working with somebody under 8)
*Smallish, sharp, pointy scissors
*Heavy scrap paper (card-stock or a magazine cover works well)
*Marker, pencil


scrumdilly-do it!


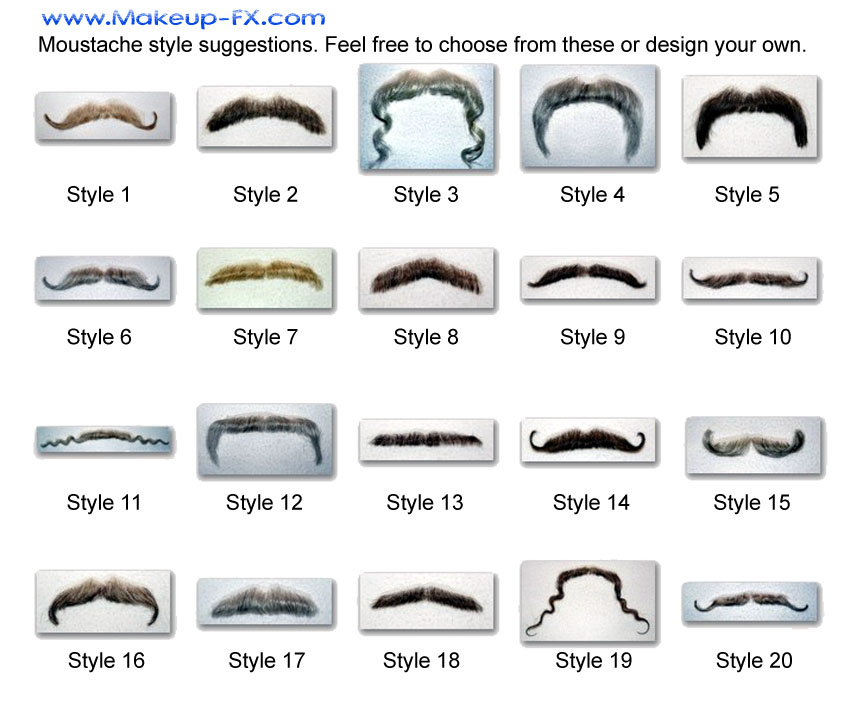
Draw one or more styles of moustache on your scrap paper using marker or pencil, and cut them out, cutting OUTSIDE the lines.  Need some inspiration?  Go here.


Ander's 'staches were between 4 and 5 inches wide, but they can be whatever size you prefer.  


Turn your felt sheet FACE DOWN (glittery side or felt-ier side down) on a protected work surface, and trace around your paper templates with a permanent marker (Sharpies or similar seem to work the best).


Cut out your felt 'staches, this time cutting INSIDE the line, so no marker is left on your 'stache.


Let your glue gun heat up while you're busy trimming moustaches.  Have a shallow bowl of cold (not iced) water nearby in case of any drip-burned fingers.


With your moustaches laying FACE DOWN on a forgiving work-surface, draw a vertical line of hot glue (or craft glue) on the right side of the 'staches.  If you are making a moustache for a lovely lefty, your glue stripe will go on the left.  


Immediately press a coffee stir stick into the glue at a right angle to your moustache.  Try not to let any stick show above the top of the 'staches.  The glue will be flexible for a bit, and you can adjust things -- just make sure not to burn yourself!


Wait a few minutes for the glue to cool, pick off any glue 'webs,' and model your creation!  Be sure to affect a reedeec-u-luss accent of some sort and waggle those brows!


You may also want to write a sweet Valentine's greeting right on the flat surface of the stir-sticks, or pop your 'stache-sticks into small craft paper lunch sacks (left flat), folding and stapling them shut with a note on the outside like this:


Group photos are strongly encouraged.

Tuesday, April 6, 2010

knots and string and friends and things

Back in the 80s I was a summer camp counselor at the Los Angeles Zoo. We taught the kids all about the environment and how everything is connected. We taught them about all the odd animals that at the time people weren't super familiar with like meerkats and cassowaries. With all the zoo learning we also managed to throw in songs, fun and games. One of my favorite projects (since I never got to go to camp as a kid) was making friendship bracelets. So easy to make and quite addicting. I think I enjoyed making them more than the kids!

Since the 80s are back (again) and handicrafts are also back, let's make some friendship bracelets a la dilly-do! I've tweaked this tutorial only slightly so that smaller tots and can knot away. All you need is a good fat yarn!

Materials
*chunky yarn, a variegated color is perfect
*large safety pin
*scissors

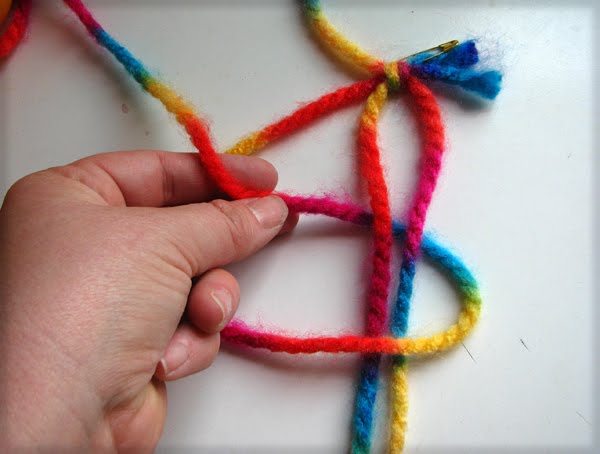
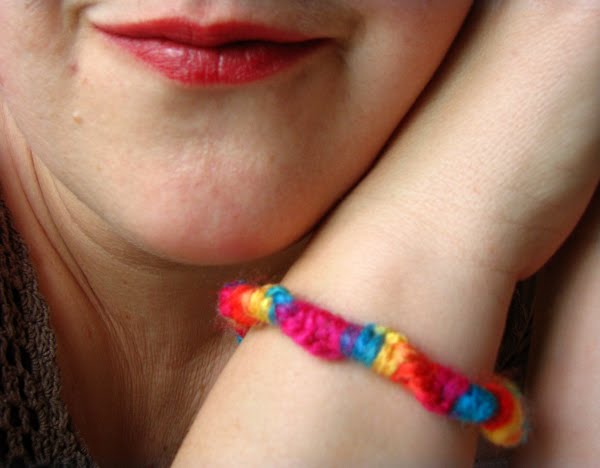
You will need three strands of yarn to make this simple bracelet. Two of the strands will be long enough to tie around your wee one's wrist with an inch or two extra to make tying easier. The third piece will be two and a half to three times longer. Cut your strings.Knot them together at one end and poke your safety pin through the knot. Attach the safety pin to your wee one's pant leg or the back of the sofa. Wherever it will be easier for your tot to work. You will want to attach it to something stable as it makes it easier and aids in providing tension to that your kidlet can make the knots without too much trouble. To make this friendship bracelet, you will need to learn is one knot and only one knot. It is really super easy once you get the hang of it, but kinda hard to show you without me being there but I'll try. To start, grasp the two strands of equal length in one hand and pull them taught towards your tot so that they are perpendicular to your tot's belly, like a line pointing up and down.The remaining strand of yarn (the long one) is going to be the single string you knot over and over again to create the bracelet. To begin, single the string at a diagonal away from the up and down string. You can angle it to either side, depending on how it feels in your tot's hands to wrap (right handed vs. left handed). From the diagonal line, about three or four inches out, bend the string so that it heads towards to other two. This will look like a pointed number four or backwards four if you're me.Next, push the tail of the long string (the one that crosses over the other two) UNDER the other two strands at a diagonal that almost crosses the first diagonal. Look at all the pictures I hope they help. If they don't, I made a video as well.Now that you have the weird four shape and two strands of yarn pointing at your tot (or you) and one extra long string out, over then under the whole mess, you are ready for the knot. To make the knot, grasp thee two shorter strands in one hand and pull taut towards your body. With the ither hand, grasp the looped, longer thread and pull up away from your body. You will then have a little not somewhere up near the top of the whole shebang. Continue with the process...make the number four, weave over under and then pull. When you get the hang of it, your knots will form quickly and create a neat twisty pattern that spirals around the two base strands. When you have enough bracelet to go around the wrist, stop making knots and tie of the whole thing. If you're feeling creative you can go for a loop top by looping the yarn into a noose-shape and then tying the other strands around it. If you want to go more traditional, you tie the bracelet onto your friend's wrist and hope it lasts forever! Happy kotting!