Sunday, February 23, 2014

valentine cloud dough fun

 
A few weeks ago we had cocoa cloud dough in the classroom. I need to get those photos up! For Valentine Week I added a box of strawberry cake mix to the dough and a side dish of crushed cocoa husks along with various tools such as a flour sifter, measuring cups, wooden spoons, and a wee mortar and pestle.We also had hearts aplenty with small jewels and heart shaped containers.
 
 
The children loved the scent of the cloud dough as did the parents. Some scooped up the dough and spooned into our muffin pan. I found the silicone heart-shaped muffin pan at the thrift outlet for fifty-cents!


I only had one sifter and it was a popular tool. The cocoa husks got dumped into the dough and then the children tried to sift the all of the flour away from the husks. They noticed that their sifted dough was more dusty than the rest and kept calling it their chocolate dust. There was also a lot of husk crushing going on. Due to having only a single flour sifter, we had to get creative...
 
 
Which brings me to the mortar and pestle. The children really liked the crushing aspect and feel for the tools. Using a tiny one I found at World Market they would go at it for all of their exploration time. A lot of focus and work was happening. As well as all those nifty motor skills we like to talk abut. If you have never tried cocoa hulls in your sensory bin, I recommend it! The scent and texture is thoroughly satisfying and when all is said and done, it makes for a great ground covering or mulch in your garden or you can whip up a wee "cocoa" bunny and add a handful to the stuffing for authenticity. Source it from a local organic supplier and make sure to dry it out in the sun before sealing it up in a bin or bag to prevent molding. Cocoa hulls are harmful to dogs and if you have a child under the age of three I would not use hulls unless supervised (as all children should be).

Saturday, February 22, 2014

valentine play dough fun

 
I always have play dough available in the classroom. Often, we make it in the morning using a no cook recipe that is mostly made up as I never write things down. It has all the usual suspects;  2 cups flour, 1 cup salt, 1/4 cup corn starch (makes it so smooth!), 2 T cream of tartar, 2 T oil, liquid watercolor, and about 1/2 cup of hot water. The measurements are not exactly exact when you let three-year-olds take the lead but it is always fun and it is always a learning process. While I would have delighted in making up a batch of pink dough for Valentine's Day, we had a perfectly good batch of aqua colored dough that came about when the children mixed their blue dough and their green dough together. Add a bunch of heart shapes and cookie cutters and voila! Valentine's Dough!
  
Perfectly good save for the fact that it kept getting more and more gooey week by week (hey, it's still good!).  I think maybe someone was experimenting with water and well since school is always a learning process, I added a cup of flour to the table for the children to knead into the dough. We call it "working the dough". I love hearing their little voices call out that they are working the dough!
  
 
This was the first time I added basic flour to the table. Some of the children spent more time playing with the flour than the dough. Across the table I even had a batch of Valentine's Day cloud dough available but I think the sensation of the flour on the table was a new and unique experience. I remember how much I loved the feeling of flour on my hands when I helped my mother bake and so we added a bit more flour just because.
  
One of the children discovered she could make heart shapes in the flour with a cookie cutter. She also discovered she could scrape and scoop the flour with the cutter as well. It was all very exciting!
 
Every time I passed the dough table I was greeted with a new sight. One of my kiddos rolled the dough out as thin as possible and stuck these festive picks into it. They kept falling over and it took a few tries for him to realize the dough needed to be a a tad bit thicker. All that flour made the dough super fluffy and not crumbly. Putting it away at the end of the day found me joyfully rolling it into balls and squishing it into the bag, you know...to dust it off, of course! 

Friday, February 21, 2014

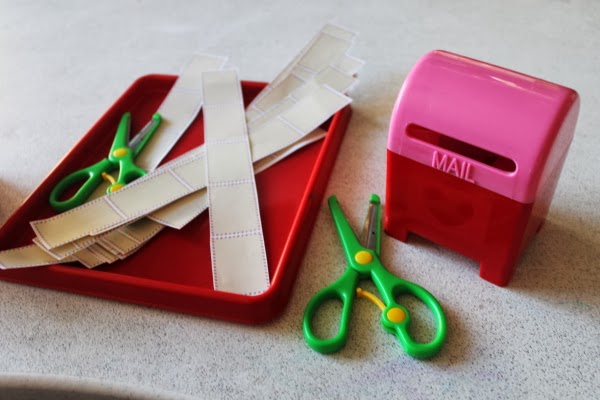
special delivery {scissors work}


For our week of Valentines I created a file of airmail envelopes for the children to cut and mail. These threes love scissors work and the mail boxes were an added bonus. We also created a post office in the classroom. More photos coming soon. If you would like to print out your own air mail strips for your classroom, click here. Enjoy!

Tuesday, February 18, 2014

book review: Meet the Artist! {Picasso and Calder}

 
Oh boy! Oh boy! Oh boy! Have you seen these wonderfully fantastic interactive books by Patricia Geis from Princeton Architectural Press? They are tremendously informative and fun (I had no idea Picasso's father was a painter or that Alexander Calder painted up a BMW). When Princeton Architectural Press contacted me to see if I would like to review a copy of each, I barely finished reading the email before I replied with a hearty YES! I'm a mad art fan however you want to spell it. Pablo Picasso and Alexander Calder are always favorites in my book so how could I say no?
I am delighted, delighted that I did. The Meet the Artist series is ever-so-lovely, well thought-out, and put together. I teach three-year-olds and already I can imagine what wonderful tools these titles will be for me in class. You can bet we are going to Calder it up with stabiles, mobiles, wire sculptures, and recycled art. As for Picasso, we will be pulling out our scissors-skills and glue sticks to make artastic collages all in his name.
 
I think my favorite parts are all the little flaps with biographic information behind them. With the information tucked behind the flaps, you could easily read the words featured on the pages as a story. With older children you can have them flip the flaps and read you the information. With even older children you can sit back and discuss what you read so really, these books are for ALL ages!
 
Both titles stand alone are beautiful to look at on the shelf. The covers are sturdy and engaging and once you open each book up you are immediately welcomed with interesting facts before your eyes hit the title page .
 
And if the subject matter doesn't reel you in, or the flaps, or the pull-outs...did I mention the pull-outs...well check out the very very back of each title to find a little bit of interactive fun that encourages you to build your own art a-la Picasso or art a-la Calder. I really, really hope to see more from this series! For now I need to order up a few copies of each...these will be dandy gifts for almost everyone in my family.

Monday, February 17, 2014

stitching mittens

Our first week after winter break was a mitten-filled week. Our literature for the week was Jan Brett's The Mitten. Our classroom was all mittened out from tiny mittens to match in the rice bin, to a mitten hunt, and a mitten tree. I thought it would be nifty for the kiddos to stretch their sewing skills by stitching up their own pair of mittens that we could revisit for our week of The Three Little Kittens.
The first thing we did to make out mittens was to gather up paper, pencils, pins, and scissors.  We needed to draft a pattern. Each child placed their hand on a piece of paper to be traced around in a mitten shape the size of their hand. I cut out their shape (otherwise this could take awhile) and had the children pick a front and back piece of wool from our wool basket (scraps of felted sweaters).
 
The children had the opportunity to pin their pattern onto their wool that I then cut for them. Wool is tricky and thick. We did this part twice, once for each mitten.
The paper was then removed, wool repinned, and needles were threaded. We talked about always poking the needle up (or down as long as it was in the same direction). The children sat quietly and really focused on this part, carefully stitching away. Some of them had trouble beginning so I would hold the mitten for them as they stitched but they soon got the hang of it and whipped through hteir mittens in no time!
 
We then removed our pins and put them back into the pin disc. Some of the children really liked this part and made sure each slot always had a pin in it so we wouldn't get stuck.
They were so proud! The next class day, the children returned with their mittens and their parents told stories of how the children wore their mittens all day and some even slept with them. I'm thinking we will make a pillow next and then maybe a stuffed lovey or two. I'm so excited!


.

Sunday, February 16, 2014

easy baking with kiddos

This Valentine's Day take on the classic magic bar recipe is far from healthy. It is however something your kiddos can easily help make and of course, eat up!
See how to make them over at scrumdillydilly! Make sure to stock up on sweets, sweets, and more sweets. I may add oats next time.

Sunday, February 9, 2014

make a cupcake liner and coffee filter {sun} flower

Back in November when we had our week of sunflowers, the kiddos make these fun coffee filter and cupcake liner flowers to take home.
 
I set up a table with all the supplies to create sunflowers along with a vase of flowers for inspiration. There were three different colors/prints of cupcake liners, brown coffee filters, tissue paper, sunflower seeds, and gluesticks. The children began with a coffee filter (though some chose not to use one) and layered on their cupcake liners after they flattened them. When they were happy with their layers, they picked a number between one and ten then counted out the corresponding number of sunflower seeds to glue onto the center of their flower-to-be.
 
 
As the glue dried on their flowers, they selected a stick (dried branches from my grapevine) and to paint with green paint they mixed up on their own choosing from a selection of blues and yellow paint (thus revisiting little blue and little yellow). Glitter is always a choice (gotta use those pinching grips) and a wee tissue leaf or two was squished atop the wet paint. Once the stems were dry, the children squeezed out a blob of glue onto their stem and placed their flower where they wanted it. This was a project that focused on following steps with a lot of fun discussion in between.

Wednesday, February 5, 2014

painting on a sphere**

squeeze bottles full of gluey paint
toy ball glued to cardboard (sand ball to rough the surface up)
give a big squeeze
adding more colors
it's all about the squeezing
masterpiece at rest
don't forget to add a large piece of paper underneath
preschool psychedelic
a little less spectacular once dry but still happy
     
**please note, if using these plastic dollar store balls, please give it a once over or two with a sheet of sand paper otherwise the paint just slips off. a wood sphere is more porous and holds paint better but if you are using what you have use some sandpaper to rough it up a bit!