Wednesday, February 5, 2014

painting on a sphere**

squeeze bottles full of gluey paint
toy ball glued to cardboard (sand ball to rough the surface up)
give a big squeeze
adding more colors
it's all about the squeezing
masterpiece at rest
don't forget to add a large piece of paper underneath
preschool psychedelic
a little less spectacular once dry but still happy
     
**please note, if using these plastic dollar store balls, please give it a once over or two with a sheet of sand paper otherwise the paint just slips off. a wood sphere is more porous and holds paint better but if you are using what you have use some sandpaper to rough it up a bit!

Sunday, January 26, 2014

best two dollars I have ever spent!


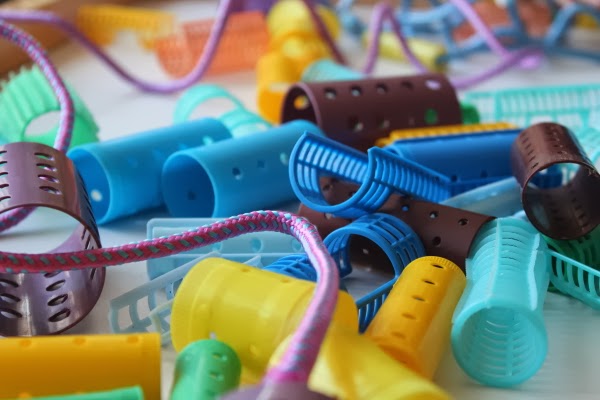
Sometime last summer I wandered into our Goodwill Outlet and came out with a bag full of old school curlers. I had the vague notion that they would be fun sensory bin items for the preschool. It wasn't until I switched schools and had my own classroom that I thought to bring them in.
 
Before I dumped them onto our train table, they got a good soak in the sun then a spin in the washing machine. Now they were as good s new!
We played with the curlers for two weeks. I sorted out all of the purple curlers and we talked about all of the little blues yellows, and greens we had to play with.
 
The children sorted them by color and/or size, stacked them up, made designs and patterns, lined them up and blew them over.
The following week, the purple curlers were added as well as a couple of jump ropes for lacing.
 
Best two smackeroos I have ever spent!

Sunday, January 19, 2014

we made a paper quilt, you can too!

Back in November we spent a week with The Quilt and all things square with a few other shapes thrown in. One of my favorite projects was making these concentric square blocks. Each child had an opportunity to layer away.

We used square format scrapbook paper, construction paper, and origami paper. The children chose their first large square and then their next and so on. We were working on recognizing size and shape. Some papers had to be cut smaller. Our kiddos are young threes so needed a little help. The fours I worked with did their own cutting and began with origami squares. Picking up the smaller piece of paper worked those fine motor skills while applying the glue to the larger worked those large motor skills.


Look how lovely the papers all look. The colors chosen were all that of the children. I have to admit I got into a zone making these too. It is too fun! We used glue sticks to adhere the papers together.
 
Some children chose to do less on their layering but then added more a day or two later. The mix of pattens and colors were truly remarkable. The paper pad we began with for the large squares was a bit united in the color palette. I think that added to the community of the project.
 
We have two separate classes in the room and each group worked on the project...teachers included. Like I sauid it was a lot of fun!
Our quilt was put together by my co-collaborator and is absolutely lovely, don't ya think? That center square was contributed by a few children on the Jr. K class who did all of the cutting themselves. So gather up some paper and gluesticks and get to it!

Wednesday, January 15, 2014

our week of sunflowers

Fall is a lovely time to study sunflowers. Our literature for the week was The Lion and the Mouse. I added sunflowers to the mix since they were growing all over town and in season. It helps that a sunflower can resemble an artistic lion...if you squint a bit.
 
My sunflowers at home had gone past a few weeks before and I saved one of the dried head for exploration. Since I had no fresh flowers I picked up a bouquet at Trader Joe's and popped them all about the classroom. One large bunch was featured on our nature and science table and one of the students got to exploring it with a cinnamon stick. Of course!
 
 
Before placing the flower head on the table, I brushed at it a bit to make it a smidge less pokey. The children explored it with our magnifying glasses and used tweezers to remove seeds.
We also had a jar of store bought seeds for scooping and pouring. SOe of the seeds made their way to our play-dough table.
 
I made the dough and added a bit of lavender oil for scent. Add some seeds and some glitter and the children played and played for the longest time!
As we observed our sunflowers, the children named the colors they saw and we sorted our beads to make our own sunflower colored bracelets.
There was also some dissection going on. We wrote down the words the children used to describe what they saw, felt, and smelled. We talked about our senses as we made our observations.
 
The children painted up egg cartons and scooped out seeds into green paper envelopes to take home for home sorting and playing. They were so proud! At the end of the week I sent the children home with a recipe for chocolate covered sunflower seed oatmeal cookies. Those were super tasty! We also did a lot of arty projects which I will post next. Sunflowers were a lot of fun to explore for the week. We will definitely do it again!

Saturday, January 11, 2014

the lion and the mouse: spin art lions!


Back in the fall we spent a week with The Lion and the Mouse. One of our art projects was to make a spin art lion. The kiddos as school LOVE painting with our salad spinner.
 
This was a bit unplanned but I knew we could do it. I pulled out some coffee filters and dis some quick scissors work to create shapes to use for lion faces. After rifling through the yarn box, I found some funky fiber and had one of the children snip a few strips for whiskers. The paint colors were decided by the children as well after a discussion on what a lion looks like (I think tigers may have influenced their choices as well).
 We used three filters per lion. One filter ends up folding into itself as it spins around the basket. The paint usually seeps through the filters so that they stick together. Three filters are stable enough to spin and hold all the paint. Each child took a turn placing his or her filters into the basket and adding paint before replacing the lid and giving it a spin or two or three or seen or twelve.
 
 
Once they were ready, they removed their now paint splattered filters and selected shapes for their features. We dialogued as they went. The paint is wet and sticky enough to hold the shapes down without needing any glue.
 
Here are two sample lions. The one on the top got three whiskers on each side "like a kitty-cat". The artist also selected orange circle ears but then wanted to turn them into eyes by adding paint. The second lion was all about the gold paint, and the whiskers across the forehead.
Can you tell this one is teacher-made? The children wanted to take theirs home after they were dry so I made one for the curriculum folder. I love how our thrifted little salad spinner can make most anything.