Monday, December 24, 2012

diy cupcake liner xmas tree ornament

There are oodles and oodles of nifty ornament projects out there on the interwebs. I like how this one turned out using what I had piled up on the kitchen table. This cupcake liner tree can probably be made without the clothespin but I really like the added element of the cothespin. Plus it adds a nifty spot perfect for a glittery star.

Materials
*cupcake liners in assorted prints and sizes
*wodden clothes pegs
*tacky glue
*flat wooden star or cardboard
*gold paint
*glitter
*metal ornament hook
Gather up your cupcake liners and get to flattening. Fold in half first and then flatten. The beauty of this ornament is that you don't need a specific color to create a pretty tree. Just gather up an assortment of prints and colors. It helps to have two sizes, regular and mini work best for the tree effect you see here. Once flattened, grab one larger liner and dollop a bit of glue on top and sandwich it inside another liner staggering it a bit so that it creates a tree-to-be shape. Repeat until you have four liners dancing a conga-line and set aside to dry. Once dry, add a line of glue along the center from top to bottom and slide the whole party into the clothes peg making sure the glue touches the peg. Set aside to dry.
 Select three of the mini liners and fold in half and flatten. Use a small pair of scissors to cut a notch out of the center.  Add a line of glue along the top portion of the clothespeg (but not the head) and gently pull the mini liners over the top staggering them so that they complete the tree-to-be effect. Set aside to dry.
If you have a small wooden star, give it a quick coat of gold paint and sprinkle a bit of glitter onto the wet paint and set aside to dry. If you do not have a wooden star, you can cut one from recycled cardboard and give it the smae treatment.
Once everything is dry, add a dollop of glue to the head of the clothespeg and nestle the star on top. 
When that dries, flip the whole bit of happy over and add another dollop og flue and nestle the metal ornament hook on top. You may need to put something underneath the other end of the hook so that it doesn't slip of the clothespeg. I found my nifty hook a few years ago from World Market. If your heart is set on this bt of pretty you might try an internet search as I have not seen them since then.
Hang on your tree or your wall or even a present. Merry Christmas! 

Saturday, December 22, 2012

make a marshmallow garland

This super easy garland project can be whipped up with even your young twos and threes. A plastic needle is extra long and should both prevent poking and swallowing. This project will work those fine motor skills and get the creative juices flowing when given a variety of marshmallows and straws to play with. If you talk to your kiddo about creating a pattern with their straws and marshmallows you've just added math to the mix. Here's what you need.

Marshmallow and Paper Straw Garland
*large marshmallows
*plastic needle
*waxed dental floss
*paper straws
*two pony beads or buttons
*scissors
Gather up your marshmallows and pop them into a pretty bowl or two. Hand your kiddo a pair of scissors (if they're scissors ready) and let them cut up their paper straws. Set the cut straws into their own happy bowl and set aside. I have found paper straws at Michael's, Target, and online. If you cannot find paper straws, plastic straws will work and can be found in many different colors.
 Thread your plastic needle (I found mine at Michael's) with a long length of dental floss that has been double knotted. You want to use dental floss to keep the line as unsticky as possible (it will still be gooey as marshmallows are magically gooey). The plastic needle will easily poke through the marshmallow and is sturdy enoug for little fingers to thread through the cut star pieces. Tie one of your buttons or beads to the end and get to threading. Here is where the patterning comes in. You can ask your kiddo to create  a pattern of two or three and then have them thread it. As they thread the pattern (red, green, marshmallow) talk about repeating and patterning. Use their example but mix it up and see if they can find the mix-up. 

 Once finished, tie off the other end with the remaining bead or button. Hang in a happy place. Merry Christmas! 

Sunday, December 16, 2012

turn those scrubby sponge snowflakes into ornaments

The plan for the scrubby sponge snowflakes really wasn't to make ornaments or anything specific but more of a printing project to keep little hands busy. Once I cut them out I thought they would make nifty ornaments and then I thought what if I wrapped yarn around them so they would look kinda like the apples in one of my most favorite fabric prints and so I went for it. What makes this even more nifty is that my small batch o' ornaments became the art for he december bed. I see many more of these ornaments in my future.  So here is how you do it.
Create your scrubby sponge snowflakes and cut about five notches into the edges all the way around. These notches will help anchor the yarn in place and allow you to hang your ornaments without using any tape or staples! 
 Cut a length of yarn at least 18" long and pop one end into a notch and begin wrapping using the other motches to hold the yarn in place. Ask your kiddos if they think they can create a star as they wrap. 
To create ornaments for your tree, loop off the final end piece and hang or give the yarn a knot that can be pushed onto an ornament hook. Easy peasy! 
 To create this wall hanging, tie five or so ornaments to a wooden spoon or nifty stick using various lengths of yarn. Use another length of yarn or fishing line tied to both ends as the hanger. If using a stick, make sure it is free of debris, visible fungus and/or critters. I banged my stick around in hopes of evacuating any wee beasties and then submerged it in water and set it outside to dry. As it turns out, there may or may not be a wee wood beetle in residence. The mister swears he can hear it, I choose to pretend he did not say that. 
Enjoy! 

Tuesday, December 11, 2012

scrubby sponge snowflakes

There are all sorts of household objects you and your children can use to make snowflake-like prints. A few years ago I used empty thread spools, this year why not try using a scrubby sponge? You can pick up a six pack of scrubbers from the  dollar store or even check under your kitchen sink to see if you have any tucked away already. 

scrubby sponge snowflakes
*cereal box or other thin cardboard
*acrylic paint in assorted colors
*plastic scrubby sponge (not steel wool)
*white paint
*glitter
*scissors
You can certainly create your snowflake prints on any type of art paper but I prefer to use up what I have so this cracker box was perfect. Simply open both ends and cut along one side with ap air of scissors. Have your kiddo squirt and dribble on two or three colors of paint. 

Use an edge of another box, folded up newpaper or paint scrapes to push, pull and scrape the paint so that it retains some of its original dribbly bits. This will create a nifty marble effect. Otherwise, let your kiddos go to town with a fat paintbrush or sponge. Set aside to dry and repeat on the flip side of your cardboard if you like.
 To create the snowflakes, pour a blob of white paint onto a plate or repurposed lid. Have your kiddo dip and press all over the cardboard. While the paint is still wet, hand them a glitter shaker and let them jazz up their snowflakes. Ignore the yarny parts of the pics. I had originally thought if I cut into the scrubby sponge five or so times and then tied it at the cuts it would make a more prominent snowflake print. It did not, though the yarn does make the picture look a bit more quirky. Set aside to dry.
Once dry, cut around each snowflake and flip over to add another snowflake print on the back. Add your glitter and allow to dry. Once dry you can tape them up on a window or turn them into gift tags. Tuck a few away and I'll show you another nifty projects to make hanging ornaments with them! Stay tuend and thank you for visiting scrumdilly-do! 


Friday, December 7, 2012

diy glittery gelt

I know, I know...chocolate gelt is a favorite of the kiddos but why not make your own glittery gelt with some tinfoil, gue, crepe paper streamers and glitter? It won't go stale and can be used for the entire season! 

Glittery Gelt
*tinfoil
*mod podge
*crepe paper streamers or tissue paper
*glitter
*paintbrush
*large circle punch or scissors

Gather up an assortment of crepe paper streamers or tissue paper and let your kiddos go to town tearing or cutting a pile of colorful bits, both will get those small motor skills moving. Place on a tray or plate and set aside.
Tear out a large sheet of tinfoil and set it up in a spallter friendly workspace. Hand your kiddo a paintbrush and a shallow dish of mod podge or watered down glue and let them get to covering up their foil a la tin foil festive. Once they are delighted with the color party hand them a glitter shake and stand back! Set aside to dry.
Once dry, fold a section of foil over itself and punch out a series of circles. If you do not have a punch, trace or draw a series of circles over folded bits of foil about the size of a half dollar and cut out with scissors.
The crimping from the paper punch and/or scissors will lightly hold together the double circles. Gently pry apart and slather on some glue or mod podge, sandwich the foil circles back together and give them another coat of mod podge. Set aside to dry.
 Once your glittery bits are dry, gather them up, grab a dreidel, it's game time! These glittery coins are great for play money or fairy money even. Not the best idea to hand to kiddos under three as they might be too tempted to take a bite or swallow and that would be bad. I'm thinking these glittery bits would also make a nifty garland. In fact, I jsut might do that...stay tuned! 

make a dreidel garland

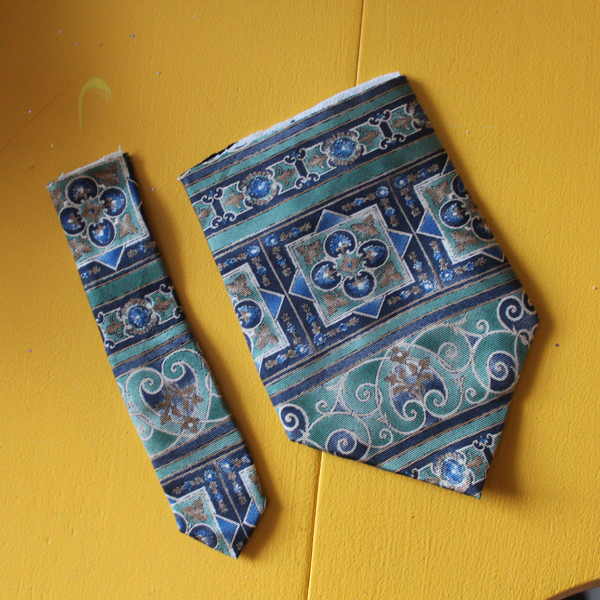
Have any neckties up for grabs? Turn those bits of swanky silk into a nifty dreidel garland. This fun project is easily created with scissors and glue. Here's what ya need:

Dreidel Garland
*eight neckties (old or thrifted)
*scissors
*tacky glue
*clothespins
*ribbon
 Gather up your neckties. I used eight to celebrate each day of Hanukkah but you can choose to use more or less. A single necktie would make a lovely dreidel decoration that can be hung on a doorknob or wall. I collected my neckties from various friends and thrift stores.  If your child is on the wee side (say younger than eight) you will want to cut the fat end of each necktie away from the rest. About eight inches is a good measure. If your child is scissors capable, they can cut off the skinny end of each tie about six inches long. If you wish to add some math fun to the mix, have them use a ruler to measure and a piece of chalk for marking. Mark on the back part of the tie in case the chalk decides to linger. 
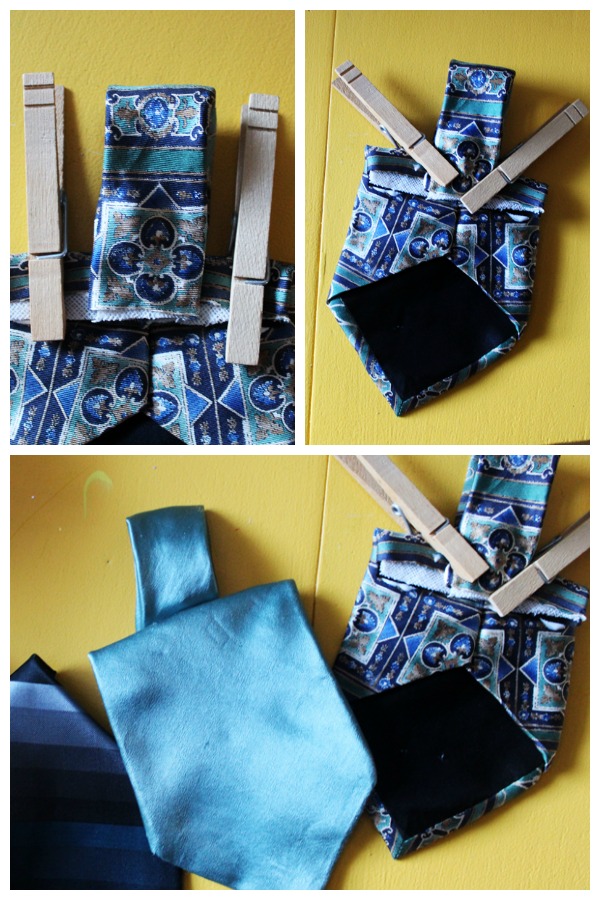
Flip each large tie piece over and have your child draw a line of glue along the top cut edge. Tacky glue works best but you can use good old fashioned school glue as well. If you liberated the fat end of the tie before the simple stitch that holds all the folds in place you may wish to add a dab of glue or so to the folds as well. Once the glue is along the cut end, carefully fold the edge over and use a pair of clothespin to anchor until the gue dries. All those layers of silk and such will want to pop away from the glue so don't forget the clothespins. If you do not have clothespins, use a sheet of wax paper on top of the glued bits and plop a large book or two on top until dry.
 After all of the now almost-dreidel shapes have been glued it is time to make the dreidel tops. Pick up a cut skinny end, draw a line of glue along the cut end and fold over but not all the way to the edge. Next, add a blob of glue along the new bottom, flip over and center onto the back of the dreidel shapes. Rearrange the cothespins to anchor down the tops and set aside to dry.
 Once dry, cut a length of ribbon and thread each dreidel onto it. Hang in a happy place and enjoy! 

Friday, November 30, 2012

make a quick advent calendar

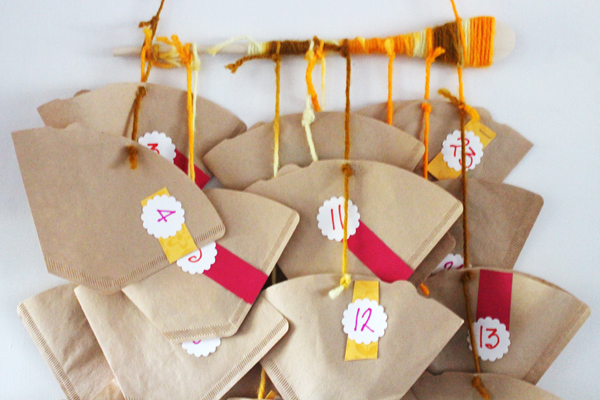
 You and your children can whip up this easy advent in a couple of hours...by yourself, you can do this in one hour. All you need is a box of cone shaped coffee filters, a wooden spoon, paper scraps and yarn. Hop on over to scrumdillydilly for the diy. 
There are many ways you can tweak this project to inclue your young children. Pre-writers can add numbered stickers to the filters while young writers can write out the numbers on blank sticker, punchedpaper or onto the filters themselves. Instead of punching holes and tying the yarn to each filter, whip out a stapler and see if your kiddos can master that skill. If not, scotch, masking or washi tape will work as well. 
Fill filters with small wrapped chocolates, stickers, and paper strips with wee adventures written upon them. Your child can tear off a filter full of fun each day! This is definitely not a reusable calendar but the process in which you make it with your child will last forever! Writing numbers, using scissors, punching holes and tying knots. The key is to have fun!