Showing posts with label holiday fun. Show all posts

Wednesday, March 27, 2013

fun with peeps


My local library is hosting a peeps diorama contest. All of  the entries are based on books. Can you guess which children's books/stories these come from? Grab yourself a shoebox, some glue, paper, pens, crayons, peeps, and your kiddos and have them construct their own. I would love to see what they come up with!

Friday, March 15, 2013

lace it up for St. Patrick's Day

There is hardly anything new to lacing up a cereal necklace for fun but here is my take on it anyway. A few years ago I did a rainbow necklace using fruity cereal for St. Patrick's Day, this time around I have tossed in some developmental goodness to the mix.
Materials:
*waxed dental floss
*scissors
*two bowls 
You can use any ring-shaped fruity cereal for this but to make it easier for your twos, threes, and fours, I would recommend Apple Jacks as there are only two colors for sorting and one of them is green! Set a bowl of cereal out onto the table, along with a cupcake liner or other small bowl and have your kido sort out the green loops. Sorting the small cereal pieces helps work those fine motor skills while color recognition works thos pre-math skills.
 Tie a length of waxed dental floss (floss works a little easier for lacing and won;t stick to the sugary cereal) to the eye of the needle so that your child doesn't lose the tail and tie a loop of cereal somewhere near the other end to keep the loops from falling off the floss.
  Now your kiddo can lace up their necklace to their heart's content or until they run out of green loops. 
You can also limit their necklace stringing to a specific number to help them practice their counting skills. 

Once finished, tie off the two ends (or if you are like me, use a wad of washi-tape) and pop over the top of your kiddo's (or yours) head to keep the pinches at bay! 

Happy St. Patrick's Day! 

Wednesday, December 14, 2011

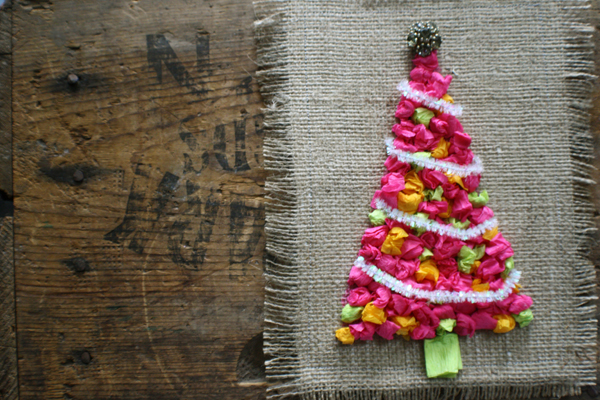
Make a Retro Tissue Tree

 When I was growing up, Christmas and Christmas decor was always a bit of a big deal in my house. There are things that only came out at Christmas time that while now long gone, still stick clearly in the noggin. From my mother's winter window ledge display (handmade by her) to our homemade salt dough ornaments (now lone gone) these iconic holiday goodies are what makes Christmas Christmas. Sadly, most of these treasures have been lost (along with my dear, quirky, mother) but a few are still around and today I am going to show you a redo of a Christmas Wall Hanging my sister made back in the 1960s, when she was six years old. For this version, you'll need to scrounge around for some items you may already have and pick up a small piece of burlap to begin, are ya ready?

Materials
*cardboard (cereal box or other thin board is fine)
*piece of burlap (my finished piece is about 8"X11")
*paint
*sponge
*straight edge
*clothespins or paper clips
*crepe paper (streamers are fine)
*white glue
*scissors
*sparkly pipe cleaner
*vintage button, pin or earring
*yarn
*tape
*sewing machine (optional)
 
Grab your cardboard and cut it down to a manageable size. The original tree is about 10"X12", I repurposed a stuffing mix box (from Turkey Day) and simply cut out the front, it measures about 8"X10".  Cut your burlap down to size about 2"-3" larger all around than your cardboard. Smother your cardboard with glue (the blank side) and center your burlap over it. Place a sheet of wax paper on top and a stack of books to weigh it all down and set is aside to dry. Once the burlap is dry, give it a whirl through the sewing machine, going around all four sides using a running stitch. I ended up doing this after the tissue tree was finished which is fine but you may wish to get a go on it first. You do not need to be it will help keep the burlap in place and give it a little extra incentive to not unravel too much.
While the glue is drying, have your kiddos select up to three (harmonious) colors of crepe paper or streamers. Streamers are great for crafting as they are inexpensive and have multiple uses. My sister's tree used three shades of green. My redo involved a bit of a modern twist on colors. Keep the palette simple which is why I suggest limiting it to three colors. Once they have their colors selected, hand them some scissors and let them cut of squares of streamer into a shallow dish. Set aside.
 While your kiddo is cutting up crepe paper, grab the other side of the box you repurposed (or any piece of cardboard) and cut out a triangle shape for your tree. This is where the straight edge comes in. This part is for grown-ups ONLY. When the glue is dry on your cardboard, clip your tree stencil to the front using paper clips or clothes pins.
Grab a small sponge or cut a clean sponge into a small square and give your paint a squirt onto a lid or other flattish container. Have your kiddo dab the sponge into the paint then onto their burlap. Have them use an up and down motion. This doesn't have to be even, this is more of a guide for the tissue paper and a nice bit of color for any spots that go unnoticed. Set aside to dry, it shouldn't take long,
Pour a small amount of glue onto a lid or other small flat dish or tray and have your kiddo grab a square of tissue and crumple it into a ball. Dab the tissue ball into the glue then place onto the edge of the triangle/tree. Continue until the tree is outlined. They may wish to use all one color or randomly mix it up, either way is fine, it is their tree.
 
Once the outline of the tree is finished, they may continue adding tissue balls until the entire tree is finished. Refill glue as needed. To create the trunk, fold one square in half twice to make a smaller squarish shape.
Once the tissue tree has been completed, give your button/earring/pin a healthy does of tacky glue and glue to the top for the tree's star. 
Next, grab your sparkly pipe cleaner and cut into four pieces varying the lengths. This will become your tinsel. Bend and shape if you wish and give each piece a good dose of glue before pressing down. Set aside to dry. Pipe cleaners and glue can be tricky as the pipe cleaner takes a while to warm up to the glue. Make sure your kiddo has something else to do next so that they do not fiddle with the pipe cleaner pieces.
Once everything is dry, use a large pin or needle to gently tug away the extra strands of burlap from the edges. They should unravel fairly easily. Your kiddo will probably like this part. Lookie at the happy fringe! Use scissors to trim if you need to.
Flip the whole thing over and tape a length of yarn to the back (one legnth of tape at each end of the yarn). I braided up my yarn, you do not have to. You can also use ribbon or twine. If you like, glue a happy paper backing to your board first so that you are not greeted with a product picture (I kinda like the product picture, it will give you a retro feel in about twenty -years or so). Have your kiddo sign and date the back as well. 
 Find a happy place to hang and admire. Now go bake some Christmas cookies! This project uses up all sorts of nifty developmental elements for your kiddo; scissor cutting, measuring, practicing the up and down of the sponge painting, small/fine motor skills during the balling and glueing, patterning and color fun in selecting their colors and shape recognition using "circles" in the triangle. This is a less than open-ended project but has its bits of usefulness in preparing your kiddo for following instructions, planning their vision within a set of instructions and using up all those nifty skills they are developing. I hope you enjoy this project and if you do make a tissue tree, please add it to the flickr group and/or email me an image and link and I'll add you to the 'do! Happy crafting!

Monday, December 12, 2011

Homemade Holidays: Tinfoil Festive Hanukkah Cards

 I never grow tired of the dazzle that is tinfoil festive. I was in in need of a Hanukkah card or two so I whipped out some supplies and created these nifty bits. Wanna make yer own set? You may already have the supplies on hand. Let's see...

Materials
*tin foil
*white glue
*cardboard (I used a cereal box)
*scissors or for grown ups only, a straight blade
*crepe paper streamer or colored tissue
*embroidery thread
*glitter, sequins or other flat sparkly bits
Set up your work area by laying out a splat mat or a large sheet of wax paper. Have your kiddo cut or tear a bunch of colored tissue (I used crepe paper streamers), other thin papers and embroidery thread or yarn. Place them on a plate or nearby for easy access.
 Lay out a large sheet of tinfoil (size is up to you). Poor a blob of glue onto your tinfoil and have your kiddo spread the sticky mess all over using a paintbrush, damp sponge or sponge brush.
Brush on or flatten on bits of tissue paper. The more you play around with them, the wetter they get which causes bunching and tearing. Add snipped bits of thread, yarn or string and then more tissue for a layered look. While the glue is still wet, dazzle it up even more with a shakey shake of glitter or salt. Set aside to dry.
While the festive fun is drying, grab some cardboard boxes (cereal and cracker boxes work great, I think I used a yogurt box) and cut into manageable, card-sized rectangles.
Create a stencil for your kiddos of whatever shape you like. I cut a triangle from a magazine insert to create the Star of David. The dreidel was drawn free-form. Flip your rectangles over so the blank side faces down and have your kiddos trace the shape onto the printed side using a dark colored marker.
Cut out the shape your kiddos traced. This part is for the grown-ups only as blades are involved.
 Once your tinfoil fun is all dry and the tack is gone, smother the printed side of your cardboard cards with white glue and have your kiddo place the cards, sticky side down on top of the foil fun. Repeat until all your cut pieces are camping out onto the foil. Lay a sheet of wax paper on top and stack a pile of books on top of that to flatten out the cardboard and give the glue a chance to stick. If you have chosen to cut your foil first, then use paperclips or clothespins to hold the edges places.
Once everything is dry, cut around cardboard with scissors and write a happy message on the back. Happy Holidays!

Sunday, December 4, 2011

Holiday Fun: Edible Memory Game

  I was hopping around the internet this morning when I came across this happy, lovely round up on Tatertots & Jello. I thought to myself "how brilliant!" and immediately clicked on over to Shindig Parties To Go to see that what I thought was an edible memory game was really a bunch of happy in a jar (which is also pretty nifty). So...taking a cue I thought "why not?" and so I present to you an edible memory game, perfect for Hanukkah, Christmas and most any other holiday.
Materials
*1 bag of wrapped flat bottomed candies (like Kisses or Patties or Hanukkah Coins)
*Printable sheet from Shindig Parties To Go, round stickers, labels or a handy decorative punch
*assorted paper for decorative punch
Dump out bag of candies. I used world coins from here. They are nice and flat and perfect for my scalloped paper punch.
Count out an even number of coins and punch out paper bits. I had 24 coins so needed 12 different prints of paper.
Smother paper bits with glue stick and place one each onto a chocolate coin or candy. You can also print out your own designs on round sticky labels or use happy holiday stickers.


Flip over and play a coupe of rounds. Save this for a party and the kiddos can keep the candy they "win".  Candies can be stashed into handmade bags like these! Happy Holidays!