Monday, December 12, 2011

Homemade Holidays: Tinfoil Festive Hanukkah Cards

 I never grow tired of the dazzle that is tinfoil festive. I was in in need of a Hanukkah card or two so I whipped out some supplies and created these nifty bits. Wanna make yer own set? You may already have the supplies on hand. Let's see...

Materials
*tin foil
*white glue
*cardboard (I used a cereal box)
*scissors or for grown ups only, a straight blade
*crepe paper streamer or colored tissue
*embroidery thread
*glitter, sequins or other flat sparkly bits
Set up your work area by laying out a splat mat or a large sheet of wax paper. Have your kiddo cut or tear a bunch of colored tissue (I used crepe paper streamers), other thin papers and embroidery thread or yarn. Place them on a plate or nearby for easy access.
 Lay out a large sheet of tinfoil (size is up to you). Poor a blob of glue onto your tinfoil and have your kiddo spread the sticky mess all over using a paintbrush, damp sponge or sponge brush.
Brush on or flatten on bits of tissue paper. The more you play around with them, the wetter they get which causes bunching and tearing. Add snipped bits of thread, yarn or string and then more tissue for a layered look. While the glue is still wet, dazzle it up even more with a shakey shake of glitter or salt. Set aside to dry.
While the festive fun is drying, grab some cardboard boxes (cereal and cracker boxes work great, I think I used a yogurt box) and cut into manageable, card-sized rectangles.
Create a stencil for your kiddos of whatever shape you like. I cut a triangle from a magazine insert to create the Star of David. The dreidel was drawn free-form. Flip your rectangles over so the blank side faces down and have your kiddos trace the shape onto the printed side using a dark colored marker.
Cut out the shape your kiddos traced. This part is for the grown-ups only as blades are involved.
 Once your tinfoil fun is all dry and the tack is gone, smother the printed side of your cardboard cards with white glue and have your kiddo place the cards, sticky side down on top of the foil fun. Repeat until all your cut pieces are camping out onto the foil. Lay a sheet of wax paper on top and stack a pile of books on top of that to flatten out the cardboard and give the glue a chance to stick. If you have chosen to cut your foil first, then use paperclips or clothespins to hold the edges places.
Once everything is dry, cut around cardboard with scissors and write a happy message on the back. Happy Holidays!

Sunday, December 11, 2011

Homemade Holidays: make a mini yarn garland

 Happy December friends! Here's a nifty, easy (with a wee bit of wait time involved) garland project that can be adapted for any holiday. This year, I am using it for Christmas but change the color of the yarn and it can become a New Year's, Valentine's Day, Halloween or Hanukkah garland as well. Your kiddos will enjoy making this as it involves that delightfully messy and sticky stuff we know as glue. Tink kiddos will fully immerse themselves into the goo but your older kiddos can have a go at working those fine motor skills as they wrap that yarn around something smaller than a balloon. Don;t forget to cover your surfaces, this can get messy.

Materials:
*5 or more plastic eggs that open
*yarn
*scissors
*plastic wrap
*wax paper
*white glue or mod podge
*sequins, buttons, happy beads or old costume jewelry bits
*4 or more mini ornaments (optional)
 Lay a sheet of wax paper over your work surface area and have your kiddos separate those eggs.
 Hand your kiddo a pair of (kiddo safe) scissors and let them cut up the yarn into a series of smallish lengths 3"-8" inches. This does not have to be exact. One long length (about 10") is enough for one evenly wrapped egg half but we're giving this project to our kiddos to do so they may prefer working with smaller lengths. Dump the yarn bits into a shallow dish with a healthy amount of white glue or mod podge and allow to soak in.
 
Wrap each egg half with a bit of plastic wrap, tucking the ends and edges up into the egg cavity. You can tape into place if you like but if you get a good bunch of wrap tucked under, it should remain in place as it sticks all over itself.
To begin wrapping, your kiddo(s) can pick up one piece of yarn with one hand while using the thumb and pointer finger of the other to squeeze excess glue out. Plop the sticky strand atop a plastic covered egg half and wrap around. Repeat with more yarn until satisfied. your kiddo can do an even wrap if they are older and more in control of their motor skills or they can do a wonky, squigglely wrap. The nifty thing is that the egg halves are so small, they won;t need a lot of yarn to cover.
Continue until all egg halves are covered and set aside to dry over night. The damp sponge is there for your kiddos to wipe excess sticky from their fingers as they work. I used the smaller, more round halves of my plastic eggs but you and your kiddos can use either/or or both. If you do not have eggs, try using an upside down egg carton covered in wrap or small round bottomed cups.
 
 
When dry, remove plastic and yarn from egg half. It should easily be separated from the egg. Next, and I suggest you do t his part, gently hold the yarn magic in one hand while pulling away the plastic wrap with the other. If there are dried blobby bits of glue, you can use your scissors to trim a little.
 
 
Hand your kiddo a bottle of tacky or craft glue and a small assortment of buttons and baubles and have them glue one happy bit into the cup of the yarn (like a nest...ooh...use brown yarn and make a spring bird and nest garland. I think I will do that!) They can of course glue more than one happy bit or if they are of the age where the baubles and bits may end up in their nose instead, let them shake a bit of glitter on top and set aside to dry.

Once everything is dry it is time to assemble garland. Cut a long length of yarn at least six feet and thread your yarn cups on. If you like you can alternate with a pretty ornament in between. I made a separate mini ornament garland and looped them up together when I hung them. Once you get the first cup on, double loop and knot one end of the yarn to anchor it in place. The first cup will be the one to keep the rest from slipping right off. To keep the whole shebang from crashing into each other, loop the yarn through each happy bit twice kind of like a running stitch, over, under and over again and on into the next one. If the yarn is too sloopy, use a small square of tape to pinch off and taper the end.
 
Once you are finished, loop and knot your ends for ease of hanging and find a nifty place to showcase. Have fun and I'm here if you have any questions!


Sunday, December 4, 2011

Holiday Fun: Edible Memory Game

  I was hopping around the internet this morning when I came across this happy, lovely round up on Tatertots & Jello. I thought to myself "how brilliant!" and immediately clicked on over to Shindig Parties To Go to see that what I thought was an edible memory game was really a bunch of happy in a jar (which is also pretty nifty). So...taking a cue I thought "why not?" and so I present to you an edible memory game, perfect for Hanukkah, Christmas and most any other holiday.
Materials
*1 bag of wrapped flat bottomed candies (like Kisses or Patties or Hanukkah Coins)
*Printable sheet from Shindig Parties To Go, round stickers, labels or a handy decorative punch
*assorted paper for decorative punch
Dump out bag of candies. I used world coins from here. They are nice and flat and perfect for my scalloped paper punch.
Count out an even number of coins and punch out paper bits. I had 24 coins so needed 12 different prints of paper.
Smother paper bits with glue stick and place one each onto a chocolate coin or candy. You can also print out your own designs on round sticky labels or use happy holiday stickers.


Flip over and play a coupe of rounds. Save this for a party and the kiddos can keep the candy they "win".  Candies can be stashed into handmade bags like these! Happy Holidays!

Wednesday, November 30, 2011

Picture Book Month

 Thank you all who stopped by! I hope you found a new book or two to read or maybe even rediscovered an old favorite. Picture Books have the ability to transport and build iomagination. I encourage you all to invest in a quality book every now and then. I have often found many wonderful titles from my local thrift stores, library sales and BookCloseOuts. If you have access to a public library, make sure to sign up for a card! To rifle through the titles and projects, you can visit my flickr set here. Happy reading!

Picture Book Month: Swami on Rye

Published by Viking Juvenile, 1995

Swami on Rye is one of my most favorite picture books (what's not to adore about cricket games, red herrings, vampires and a father-to-be flying about on a magic carpet?) Maira Kalman is one of my most favorite people ever. She is a visionary and secretly I liken myself to being a kindred spirit with her. Though she is probably much more interesting than I.  Truthfully, any of the Max books are a good choice. People can be very particular about their favorite Max book, I happen to like this one best. Max books are lyrical and slightly nonsensical. They are not even close to being linear and quite difficult to read out loud to a large group (I speak from experience). One on one however, they are perfect and full of whimsy and wonder and quirk. They are probably more suited for us grown-ups yet I know oodles of kiddos who adore Max as much as I do. Don't miss out on Max or Maira, there is sure to be something for everyone in her wonderful world.

Don't forget, November is picture book month. Check out the official
blog here!

Tuesday, November 29, 2011

Picture Book Month: Mary's Penny

Written by Tanya Landman
Illustrated by Richard Holland
Published by Candlewick Press, 2010

Mary's Penny is a retelling of a traditional tale with all the markings of a fairy tale as well (save for any fairies). Mary is the daughter of a farmer and sister to two brother's. One day her father gives each son a penny and tells them that whomever can fill the house with something purchased with their penny will get to run the farm. Mary, being a girl, is not included. At least, not at first. Richard Holland's collaged illustrations are wonderful and the story is so simple and lovely I urge you to pick up a copy. This is one for my bookshelves.

Don't forget, November is picture book month. Check out the official blog here!

Monday, November 28, 2011

Picture Book Month: Tommaso and the Missing Line

Published by Knopf Books for Young Readers, 2008

In a nutshell, this is the story of a boy searching for his line. Yup, HIS line. He once drew a picture of his favorite view that showcases the most lovely of arced lines. One day he pulls his picture out of his pocket to find the line has vanished! Tommaso then sets out to find his missing line. Told with simple words and creative illustrations your kiddos may find themselves inspired to draw their very own picture with a very orange line. Enjoy!

Don't forget, November is picture book month. Check out the official blog here!

Sunday, November 27, 2011

Picture Book Month: Bonnie's Blue House

Written & illustrated by Kelly Asbury
Published by Henry Holt & Co., 1997

Bonnie's Blue House is one in a trilogy of nifty picture books by Kelly Asbury. With a retro feel and simple dialogue, you and your kiddos will delight in Yolanda's school day. The other two titles are Rusty's Red Vacation and Yolanda's Yellow School.

Don't forget, November is picture book month. Check out the official blog here!

Saturday, November 26, 2011

Picture Book Month: Song & Juniper

by August Hall
Published by Big Kid Books, 2005

I know, I'm sorry, another out of print title but you can find these used and at your library and really, libraries are the best things so make sure you have a card if you are able. This lovely book has absolutely gorgeous illustrations. The simple story details a day spent with Song & Juniper. Simple and very pretty. I hope you get a chance to check it out!

Don't forget, November is picture book month. Check out the official blog here!

Friday, November 25, 2011

Picture Book Month: Supermoo!

Written & Illustrated by Babette Cole
Published by Mammoth, 1994

Supermoo is a story about a super cow. I know! Back in my nannying days, my kiddos LOVED this book. So sit down, give it a read and set your kiddos to creating their own super hero personas.

November is Picture Book month, check out the blog here.

Thursday, November 24, 2011

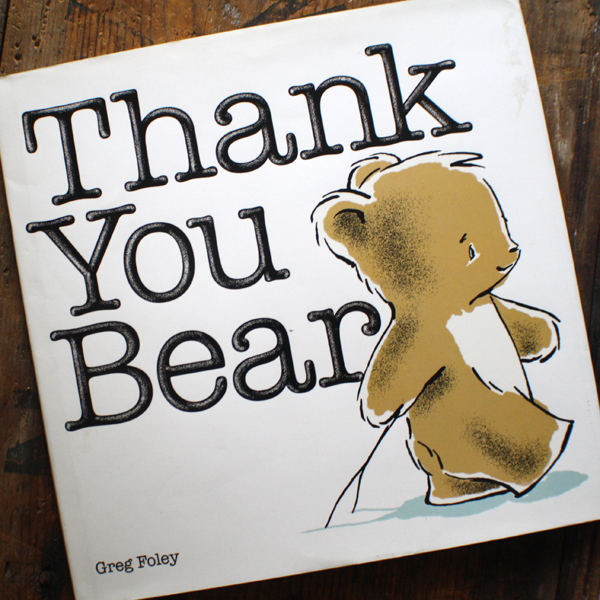
Picture Book Month: Thank You Bear

Written and Illustrated by Greg Foley
Published by Viking, 2007

This is such a sweetie, sweet book of friendship. The illustrations couldn't be any sweeter. It is the story of a bear who finds the greatest thing ever to give to his friend, mouse. 

To tie in a project with your kiddos, have them paint up a perfectly perfect box just for fun 9or to gift). 

Materials:
*empty box or carton
*paint
*paintbrushes and/or markers
*glue and gluey bits
*tiny toy (optional)

Juice boxes work great for this. To make it a home for a tiny toy, cut out the front or back of the box with a kinfe/blade. This is NOT something for your kiddo to do. YOU can prep the box by cutting first.

Set up craft area with a splat mat or table cover and hand your kiddos a large(ish0 paintbrush and some white paint.

Paint up boxes and set aside to dry. The white paint will prime your box so your kiddos will have a blank canvas.

Once dry, hand your kiddos smaller paint brushes, markers and or collage bits and glue and let them go to town.

November is Picture Book month, check out the blog here.

Wednesday, November 23, 2011

Picture Book Month: Penguin


Published by Candlewick, 2007

Penguins books are quite popular, they are fun and penguins are adorable, right? Penguin is not your average penguin story. True, it is fun and the penguin in question is adorable but there's a sneaky sneak twist at the hands of a very blue lion. Hysterical! Polly Dunbar is also one of my favorite illustrators so if blue lions aren't your thing, make sure to pick it up for the pictures alone and don't forget to check out her other titles.

November is Picture Book Month! Check out the official blog here

Tuesday, November 22, 2011

Picture Book Month: The Opposite

Written by Tom MacRae
Illustrated by Elena Odriozola
Published by Peachtree, 2006

It goes without saying (at least for me, ahem) that a picture book written by a fella who writes Doctor Who episodes would be unique, witty, and so very clever. The Opposite is just that and if I had more wits about me I would present my recommendation oppositely but my wits have gone off on holiday so all you have is this picture and my word. Oh, and if the story itself doesn't convince you, please take some time to soak up Ms. Odriozola's unique illustrations. They are amazing!
Create your own Opposite with a little paint and a toilet paper tube.

Materials:
*empty toilet paper tube
*white acrylic paint plus other colors
*paper
*permanent pen
*scissors
*glue stick
We're going to create our own Opposite in the style of Ms. Odriozola's amazing illustrations. First thing you need to do is have your kiddo(s) paint their tube white. They can of course paint it another color but make sure it is a light color. Let dry.
 Once dry, cut the top of the tube in a curve to create your Opposite shaped head. 
Next, draw a circle at the top for the face and draw the face. Look at the illustrations in the book and emulate the same style. Keep it simple.
Hand yer kiddos a paintbrush and have them paint up their bodies. Set aside to dry.
While drying, cut two strips from white paper and have yer kiddos paint up the arms as well. When they are dry, affix to your Opposite with a swipe of glue stick. Ta-da!


November is Picture Book Month! Check out the official blog here


Monday, November 21, 2011

Picture Book Month: Sleepy Pendoodle


Written by Malarchy Doyle
Illustrated by Julie Vivas
Published by Candlewick, 2001

Another great read aloud, Sleepy Pendoodle is a sweet book about a young girl and her new puppy. Julie Vivas' illustrations are an absolute favorite of mine and the silly-sweet stumbles as the little girl does her best to wake her puppy with the magic words will have your kiddos smiling, smiling, smiling.

November is Picture Book Month! Check out the official blog here