Friday, December 7, 2012

make a dreidel garland

Have any neckties up for grabs? Turn those bits of swanky silk into a nifty dreidel garland. This fun project is easily created with scissors and glue. Here's what ya need:

Dreidel Garland
*eight neckties (old or thrifted)
*scissors
*tacky glue
*clothespins
*ribbon
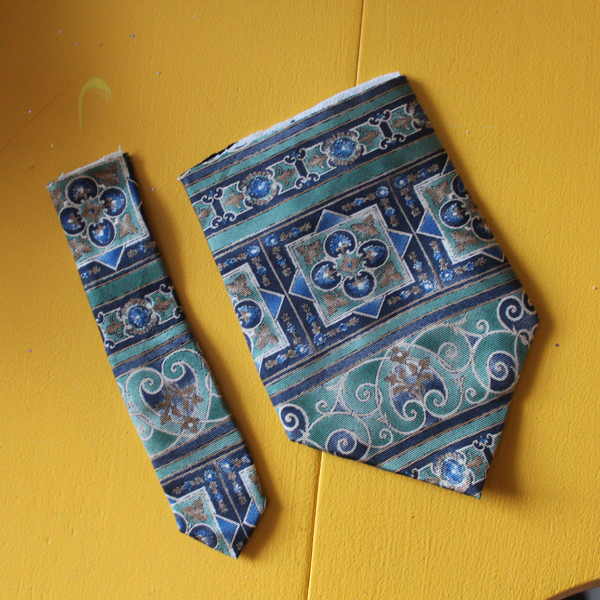
 Gather up your neckties. I used eight to celebrate each day of Hanukkah but you can choose to use more or less. A single necktie would make a lovely dreidel decoration that can be hung on a doorknob or wall. I collected my neckties from various friends and thrift stores.  If your child is on the wee side (say younger than eight) you will want to cut the fat end of each necktie away from the rest. About eight inches is a good measure. If your child is scissors capable, they can cut off the skinny end of each tie about six inches long. If you wish to add some math fun to the mix, have them use a ruler to measure and a piece of chalk for marking. Mark on the back part of the tie in case the chalk decides to linger. 
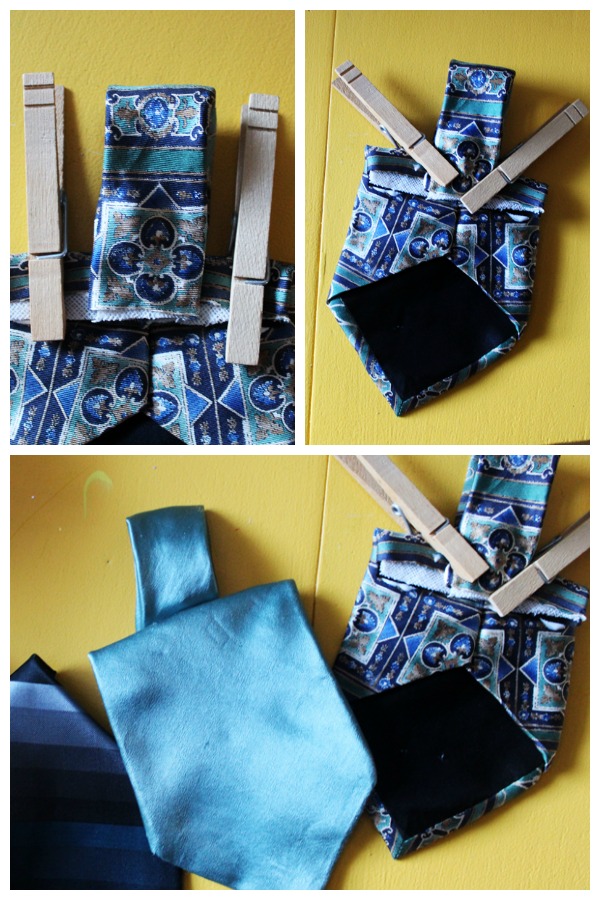
Flip each large tie piece over and have your child draw a line of glue along the top cut edge. Tacky glue works best but you can use good old fashioned school glue as well. If you liberated the fat end of the tie before the simple stitch that holds all the folds in place you may wish to add a dab of glue or so to the folds as well. Once the glue is along the cut end, carefully fold the edge over and use a pair of clothespin to anchor until the gue dries. All those layers of silk and such will want to pop away from the glue so don't forget the clothespins. If you do not have clothespins, use a sheet of wax paper on top of the glued bits and plop a large book or two on top until dry.
 After all of the now almost-dreidel shapes have been glued it is time to make the dreidel tops. Pick up a cut skinny end, draw a line of glue along the cut end and fold over but not all the way to the edge. Next, add a blob of glue along the new bottom, flip over and center onto the back of the dreidel shapes. Rearrange the cothespins to anchor down the tops and set aside to dry.
 Once dry, cut a length of ribbon and thread each dreidel onto it. Hang in a happy place and enjoy! 

Friday, November 30, 2012

make a quick advent calendar

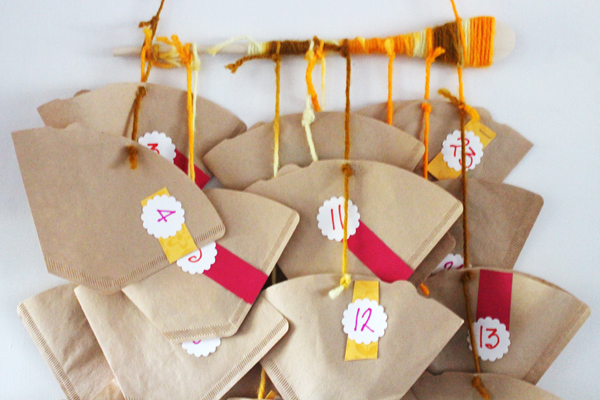
 You and your children can whip up this easy advent in a couple of hours...by yourself, you can do this in one hour. All you need is a box of cone shaped coffee filters, a wooden spoon, paper scraps and yarn. Hop on over to scrumdillydilly for the diy. 
There are many ways you can tweak this project to inclue your young children. Pre-writers can add numbered stickers to the filters while young writers can write out the numbers on blank sticker, punchedpaper or onto the filters themselves. Instead of punching holes and tying the yarn to each filter, whip out a stapler and see if your kiddos can master that skill. If not, scotch, masking or washi tape will work as well. 
Fill filters with small wrapped chocolates, stickers, and paper strips with wee adventures written upon them. Your child can tear off a filter full of fun each day! This is definitely not a reusable calendar but the process in which you make it with your child will last forever! Writing numbers, using scissors, punching holes and tying knots. The key is to have fun! 

Thursday, November 8, 2012

a sea shell, dim sum, forgotten cows and a mama that zooms...

Here are four more great books for kiddos featuring a variety of faces and fun. I apologize for the blurriness of some of the photos, my trusty old Rebel took a dive on our last road trip and my new camera just arrived two days ago. Since I had been gearing up for picture book month, I had already taken photos of thirty different children's books! Yay for reading! 
Written by Judy Cumberbatch
Illustrated by Ken Wilson-Max

Written and Illustrated by Grace Lin
Written by Kelly Cunnane
Illustrated by Ana Juan
Written and Illustrated by Jane Cowen Fletcher

Sunday, November 4, 2012

November is Picture Book Month

I had grand plans, BIG plans even but somehow time ran away from me so all I have right now for you are four books, all delightful,  you may or may not know...

Written by: John Coy
Illustrated by: Carolyn Fisher
Reading Rainbow video here

Written by Ken Kimura
Illustrated by Yasanuri Marukami

Written by Fran Manushkin
Illustrated by Dan Yaccarino

Written and Illustrated by Troy Cummings

Sunday, October 28, 2012

halloween: make a glittery spiderweb garland


There are three days left until Halloween, just enough time to create this nifty spideriffic garland. All you need is yarn, glue and glitter. This is a project you will need to work on with your kiddos. Your kiddos can practice their cutting skills by cutting the lengths of yarn, they can also pour the mod-podge or glue and dump yarn into the mess for saturation. They may also a go a tad bit wild with the glitter, have fun! 

materials
*white glue or mod lodge
*yarn
*glitter
*wax paper or plastic wrap
*pencil
*yogurt lid, compass or other circle to use as pattern
*scissors
*shallow dish

Grab your wax paper and lay out a sheet on a surface where it can camp out for a day or so. Use a ball point pen or pencil to trace or draw a circle about six inches wide. Draw at least five for your garland so it won't take forever for your webs to dry. 
Pour your mod-podge into a shallow bowl. If using glue, mix your glue with a little water to thin it out. Cut a series of short lengths of yarn. You will need five for each web, four about the same length and one a couple of inches longer. My strands were 3" and 6".
 Dump all your yarn strands into the sticky mess. To create a web pick out one of the sticky soaked yarn strands and pull of excess mod-podge using your fingers. Lay the first strand across a circle, add your second strand across the first and repeat with the next two strands to create a sort of asterix/star shape. Alternately, you can try to craft a web as you see fit or your kiddo can mound a stringy mess to their delight. Set aside to dry for at least four hours. Drying time and sturdiness of your webs depends on the goopiness of your yarn when you begin.
Once dry, use a paintbrush to paint on a bit of glue to the surface of your webs. Sprinkle a bit of glitter on top and set aside to dry for one hour. 
Once dry, gently peel back the wax paper to reveal your web. If you have extra blobs of dried glue in between the strands of your web, use a pair of scissors to trim. To create your garland, cut a length of yarn at least three feet long and thread your webs onto it. You can tie loops at each end for hanging or use a couple of pieces of happy tape to affix to your wall. 

*Yikes! I thought I took photos of each step but I did not. I hope you enjoy this project any way, thank you!

Tuesday, October 16, 2012

it's pumpkin{spice} time

We go through  lot of play dough at the preschool. A LOT. That means we make a lot of play dough. Kiddos never seem to tire of the stuff and so we make batch after batch after batch. Currently, we've been whipping up so fall fun. Here is the recipe we use so you can make your own. Have fun!

Pumpkin Spice Playdough
2 cups flour
1 cup salt
4 tsp cream of tartar
5 tsp cinnamon
1/2 tsp nutmeg
1/2 cloves
2 cups water
2 tbsp oil
food color (optional)

This will keep well in an airtight container or zip bag.

Monday, October 15, 2012

halloween dilly-do!: spoon ghosties

This quick and easy project can be made in just a few hours. The longest wait is for the paint to dry. While you and your kiddos wait for the paint to dry, why not read a couple of Halloween Books and/or write out a silly ghost story to perform? Here's how you do it!

Materials:
*wooden spoons
*white acrylic paint
*paint happy work surface
*paint brush
*permanent markers
*one pipe cleaner per spoon
*cheesecloth
*white glue
*scissors
Gather up your wooden spoons and have your kiddos give them a coat or two of white paint. Set aside to dry.

Once dry, add faces using your permanent markers.

Grab a pipe cleaner and have your kiddo lay pipe cleaner down on work surface then placing their spoon on top. Take each end of the pipe cleaner  and bring up to center then back down so that each end is now on the opposite side from which it began. Continue to wrap the ends around the spoon handle so that they meet in the back then give them a twist. This sounds complicated but it's really easy just wrap it around and twist. Viola! Arms! Give the tip a bend so that they don't poke through the cheesecloth.

Cut a squareish piece of cheesecloth at least ten inches wide. Dab a smidge of glue to the top of the spoon and drape your cheesecloth over the spoon until you have a happy ghostie!

Have a spooktacular Halloween! 

Saturday, October 13, 2012

Halloween: zombie scarecrow

Happy October folks! This is less a diy, more  a why not try this type of post...here in a-go-go land zombie-making is a family affair (though, truthfully, all I did here was help pick out the jacket and tie).  A frame was built, and clothing stuffed with newspaper and a smidge o' hay.


The head was made by stuffing a paper grocery sack with newspaper and the smooching and shaping it  with masking tape. Afterwards it was wrapped in paste-soaked newspaper and allowed to dry. Once dry, paint and paintbrushes made an appearance.


While the head dried, the shoes were made to look old and bloody, red paint was added to the body and a request was made to find some sort of hair (a wig was eventually re-appropriated).

The head was affixed to a stick and jammed into the body and viola! We had a zombie on the lawn!

Saturday, October 6, 2012

Show Me a Story; winner announced!

Greetings, friends! I am so sorry I did not get to posting the winner yesterday as I wrote I would. Thirteen people left comments about heir favorite picture book. Seven left their email as requested so seven names went into the lime green bowl. After swirling the bowl around a bit, I stuck my hand in and pulled out....

Sarah wrote:
This would be great! In the spirit of October, my favorite book for Halloween is, "The Little Green Witch". 

Congratulations Sarah! I have sent you an email requesting your info. Enjoy the storytelling! Thank you to everyone who left a comment. I enjoyed reading of your favorite picture books. Don't forget, November is picture book month and I'll have a book a day posted for you to enjoy. Happy October!

Wednesday, October 3, 2012

Show Me a Story; book love and giveaway

Happy October, friends! Today I am delighted to be a part of a wonderful book tour promoting the book Show Me a Story by Emily K. Neuburger of red bird crafts. Emily has packity-packed her book full of inspiring ideas, projects and activities to get you and your wee one’s literary juices flowing. Forty craft projects and activities fill the pages to spark children’s (and your own) storytelling.
Show Me a Story is a published by Storey Publishing and is a fantastic specimen to add to your library. As an educator and all around literacy enthusiast I found Show Me a Story enticingly creative. Emily has not only written a wonderful introduction explaining the benefits of storytelling with children but she has given you a basketful of encouragement to share your own stories.

I spend much of my work time hanging out with toddlers. While their language is not quite up to a storyteller’s caliber I found many of the projects in the book to be adaptable for them and their older schoolmates to manipulate and play with. I have pretty much bookmarked all of the projects for future use and decided to create a few sets of the Magic Pebbles found in chapter four. Magic Pebbles are less a tool to get children writing and more an object for exploration and imagination.
Each pebble got a couple of coats of paint, a dash of glitter and a bit of mod podge to seal it all in. I presented their cheerfulness in a trio of strawberry baskets placed on a table out in our courtyard. The toddlers headed straight for them and the soon were scattered, lined up, horded, carried and dumped into our water table. One youngster attempted to stack them up like blocks. I couldn’t have been more pleased.
I did not get to observe our three year olds or pre-k students play with them but each time I passed the table those pebbles appeared to be in a new arrangement. From lining up, to stacking and even color sorted, I think these pebbles were a hit. My next batch however will include a water resistant sealant of some sort. At the end of the day, most of my pebbles had lost their color but I am certain they had quite an adventure.
I also whipped up a small bag for each set of pebbles following this tutorial. After a bit of stitched whimsy and an adventure in stamping the bags to read magic stones, I think they will make a great gift for any young person in your life.
If you are in the United States and would like to have a chance at winning your own copy of Show Me a Story, please leave a comment here, along with your email sharing with me your absolute all time favorite picture book. I will select a winner Friday so be sure to return to the ‘do! You can also enter to win a copy by visiting the Storey Publishing blog. I hope you get a chance to view the book. Happy reading, friends!