Monday, July 30, 2007

Let your fingers do the walking...


This is just a quick hint of fun for those moments when you really need something to do fast! You can use and ink pad or washable markers. Just let your kidlets ink themselves up, walk their fingers across their paper, embellish and viola! instant fun! If using an ink pad, you will want to use one that is washable. Discount School Supply carries large pads that are perfect for wee hands and they are refillable with Liquid Watercolor. If you decide to go the marker route, washable of course, you may want to wait for a bath night since your kidlet just may end up inking themselves up to eternity. If they do, you can read them my most favorite read aloud book ever...Purple, Green & Yellow by Robert Munsch!
Have fun!

Added: Check out Melissa's Buzz Off for nifty pics of fingerprint art in action! (I just caught it today. Darn! I have to many blogs I read...)

Thursday, July 26, 2007

Tin foil festive...


 This simple and slightly gooey activity has such eye pleasing results why not do it over and over and over again?

What you need:
*tin foil what ever size ya like (I reused a clean smallish piece from take-out)
*glue
*water
*paint brushes and sponges
*tissue paper scraps
*glitter, sequins, plastic jewels and/or other collagable fun
*work surface


scrumdilly-do it:

Give your kidlet a sheet of tinfoil. You can wrap the foil over a piece of recycled cardboard or keep it on a tray or cookie sheet for easy mobility. You will want a sturdy surface underneath when your wee gets all glue happy. With the foil, set out a shallow dish or bowl of tissue paper scraps, either cut or torn. You will also want to set out a small cup of watered-down glue, a paintbrush (a sponge brush works wonders) and some collagable bits.


If you are brave, set out the supplies and let your wee ones have a go. For the not so brave I have broken it down into steps of a sort.
 First, have your wee one squirt glue all over their foil.

 Using a damp sponge or sponge-brush, have your kidlet blend the glue so that the foil sheet is COVERED.

 
 Next up, let them go paper crazy with the tissue, placing their pieces wherever they like adding some watered down glue for more stickability and to allow for layers.


 Once they are done with their tissue work they can add glitter, sequins, etc. Set aside to dry and enjoy when it is done!


These would make for awesome cards for family and friends. Once dry, glue to the front side of a blank card and cut down to size. Have fun!

Monday, July 23, 2007

Fun with sidewalk chalk


Sidewalk chalk is usually always a good time. I keep a bucket in my car for leaving notes to friends or writing surprise messages on the sidewalk. I have to admit I haven't done the surprise message in awhile but I do write birthday messages for my neighbors still.

When the bushee boy gets restless I pull out the chalk. He's really getting into the motion of drawing and his movements have switched from broad strokes to specific shapes. It is very exciting to watch! What am I going to do when they move away? Here's a twist on sidewalk chalk that I think most kidlets will enjoy. You can even do this on a summery rainy day!

What you need:
*sidewalk chalk
*bowl or other unbreakable container
*water to cover chalk
* a cup of sugar
*wet sidewalk, rocks, any surface that is okay to draw on, large sheets of dark paper.

scrumdilly-do it!

The chalk looks best if it gets a chance to soak, so if you can, do this the day before and/or keep the chalk stored in a container of sugar water. Add your chalk to your container and enough water to submerge. Dump about a cup of sugar into the water and watch the bubbles come to the surface just because it is fun! Set aside and let sit overnight or a few hours. Soaked chalk changes its texture and the sugar amps up the color a bit while keeping the texture semi smudge proof.
Head outside and pour a small bucket of water onto the sidewalk/pavement you are going to use. Set out the chalk and let your kidlets have a field day! You can do this on a dry sidewalk but the darker the workspace, the brighter the colors.

The wet chalk has a super nifty texture and will work on all sorts of surfaces.


A pinecone or a rock.

The best part is it can easily be hosed off! Adds some large paint brushes or sponges to see what happens when you blend the colors. Have fun and don't forget to let your kidlets experiment!

This also works great as body paint, keep away from eyes just to be safe.

Friday, July 20, 2007

Quick craft fun


Got a bored kid who says there is NOTHING to do? Toss him or her a large sheet of clear contact paper and some collage materials and let them have a go at it.

What will they create? Once they are done with all the arranging, either fold over their work to seal the deal or add another clear sheet of contact paper to the top. They can then cut up their work for window hangs or bookmarks or you can display their collage as is. Have fun!

More contact paper fun:

Wednesday, July 18, 2007

Fun with ice...or snow!


 For those of you in the middle of the summer heat, you can do this project easily with a store bought block of ice or your own homemade block. I used a frozen juice can. Those of you with access to snow, I say get yourself a bowl-full and let your wee ones have a go at it!

What you need:

*block of ice, store bought or homemade
*a cup of salt
*liquid water color or watered down food color
*containers for your "paint" (i used disposable ice cream cups from a local scoop shop)
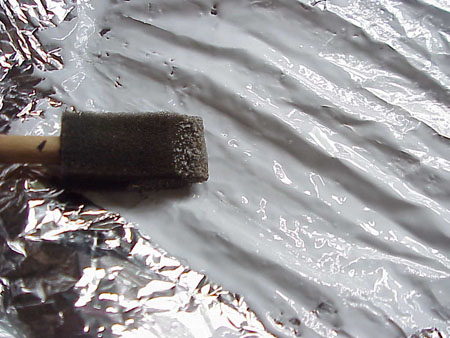
*sponges and/or paint brushes, eye droppers
*a tray with edges (like a cookie sheet with sides)
*squirt bottle(s)
*paper towels or clean scrap rags

scrumdilly-do it!

This is super easy, super delightful, wet, messy and scientific to boot! Place a paper towel or rag on top of your tray/cookie sheet. Add you ice block and get ready for some fun! The rag/towel will keep the ice from scooting all over the place. You can of course do this project outside. A kiddie pool would probably be a blast for your wee ones. If using snow you can pile up your mound on the tray or keep it in your bowl, it is up to you.
 
Set out your supplies and let your kidlets have a go. Paints should be in accessable cups. Add some paint and salt to a squirt bottle for variety. Adding salt to the top first, then brushing all around your ice with some salt water will help speed the melting process along. The salt will also create cracks in the ice which will hold the paint color for a little while. It looks mighty nifty!


Ice droppers would be awesome for snow. A sponge brush works best with the ice as well as a squirt bottle. I add all the different elements so that I can ask the kidlets questions. "What do you thing will happen if we squirt the ice with a stream of water? What if we used a mist? Which brush will help melt the ice faster? What would happen if we added salt to the paint first? What if we used hot water?"
 
If the block gets too muddled with color, pour some clear water on it and have your wee ones start all over again! I did this when my three your old friend came over to play. We took it outside for some more exploring.


He spent the rest of the day checking every half hour or so to see if it had melted yet. Make sure to say things like "Hey! What kind of science are you doing? Are you a scientist? Why is the ice melting? How long do you think it will take to melt to nothing?" All in all let your kidlets explore and have fun. If your wee ones are too small or you don't have any color on hand, hand them some sponge brushes and a bowl of water and let them paint the sidewalk. Tell them they are observing the act of melting at work! Most of all...have fun!

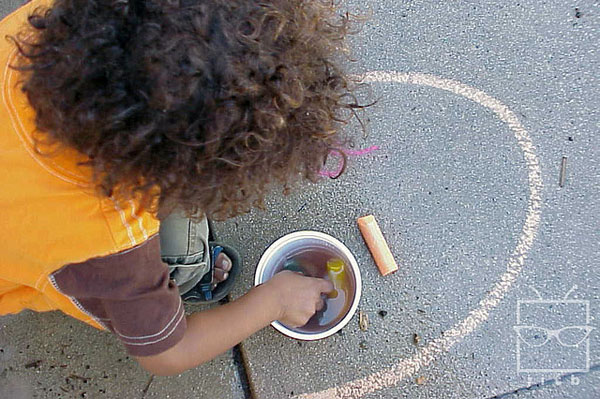
Coming up, summer fun with chalk!

Monday, July 16, 2007

Fun with Straws

Another Kitchen Craft idea: Straw Beading
All you need is straws, scissors, masking or packing tape and string. I use the tape to stiffen the ends of the yarn. You can use skinny ribbon, shoelaces, yarn, twine, etc. If your wee ones are too young for scissors, cut up the straws yourself. I got this nifty pack at the dollar store. Have a container of cut straws ready and your kidlets will always have something to do even if only for a minute or two!

String up one strand for a necklace or shake toy for a little brother or sister. String up a series and make a beaded curtain for the doorway or window or maybe even a kitchen table fort. Toss in some pasta, holey cereal and beads and who knows what your kidlets will create.

Have Fun!

Tuesday, July 10, 2007

Sunday, July 8, 2007

Repurposed Art Part Three

Contact paper is your friend! There are oodles of things you can do with clear contact paper. One of my favorite things is to use it to cover artwork, which I then turn into stuff!

You can make bookmarks, wallets, mobiles, window hangings and sun catchers and containers.
What you need:
*artwork by you or your wee one(s)
*clear contact paper (aka shelf paper)
*string, yarn or twine
*a hole punch
*scissors

scrumdilly-do it:
Make a container. To make a container you can use one or more pieces of artwork. This project is best done by an adult or older kiddo. Measure out a square for your base. I used 5 inches.Then measure out your four sides. Mine are four by five inches.

Roll out a piece of clear contact paper to size. Add your pieces to the paper and smooth down on top. Roll out a second sheet approximately the same size and place that sheet sticky side up on your work surface. Lower your art piece down on top of the sticky side with your artwork facing down. You can also simply cover your whole piece of art in clear contact paper and then cut. Whichever floats your boat will work.
Cut out pieces and lay them out with your square in the center, artwork facing down and your sides placed around the square. Place each side on top of the square aligned with one edge artwork facing you and punch four holes into the pieces. Repeat for each side.

Overlap each piece and punch holes into the sides. Each side will have holes along three sides. The topside will be hole free.

Cut yourself a long strand of string and begin lacing your box together. I tie a knot around the first hole and then lace the bottoms with one continuous weave.

Once your sides are stitched to the bottom your box should look like this:
 Next up stitch the sides from the bottom up and then tie off at the top. Once you are done you can use your container as a plant holder or container for all sorts of stuff. You can even attach a handled and turn it into a gift bag! Just remember not to fill whatever it is you make too much. Your container will be a little bit on the delicate side. It will be sturdy enough, you just can’t fill it with heavy stuff.

Have fun!

Wednesday, July 4, 2007

Boredom Buster: Fireworks Painting


This is super fun and super easy and the results are always exciting! I'm sure most of you have done this when you were a kidlet but back then we turned our pictures into butterflies.

What you need:
*red, white and blue paint (of course any colors are great)
*large sheets of white or blue paper. The heavier the stock, the better.
*squirt bottles for the paint or paper cupcake liners
*glitter

scrumdilly-do it!


Gather your supplies and work on a washable surface.


Fold your paper in half and start adding paint to one side ONLY! Kids can squeeze the paint onto the paper (which will allow for some great mess making opportunities) or if using the cupcake liners, simply have them push from the bottom making the liners turn inside out. Then they can "paint" with the liner or they can drip, drab and dip to their hearts' content.


Next up, fold the paper over to the other side and rub, rub , rub away.


Open and add glitter and viola! You've got fireworks! Have a safe and Happy Fourth of July!

Monday, July 2, 2007

Repurposed Art, Envie Making Part 2

If you don't have templates, you can use any old envelope you have on hand. All you need to do is open them up, trace onto the back side of the artwork (or magazine page), cut, fold, and glue. Use tiny gift envies for stroing little things. Have fun!
repurposed art envie making part two